Self-installation of siding: stages
After
completing the assembly of the frame, the correct position of the elements is
checked, the detected deficiencies are corrected, and then they proceed to the
installation of the plates. To hold the planking, you will need to fix the starting
profile and corner strips. When carrying out work, it is necessary to follow
the recommendations of the manufacturer of the trim.
Failure to
comply with the requirements will lead to distortion of the panels or damage to
the edges.
Before
starting installation work, the quality of the products is assessed:
Selectively
inspect products, uneven coloring with foreign inclusions is not allowed both
on the front and on the back of the part. There should be no peeling of the
protection on the metal plates.
Several
elements are examined to assess the uniformity of the wall thickness. Floating
sizes or depressions indicate poor product quality.
Check the
condition of the mounting holes. Burrs or burrs are unacceptable. At the same
time, you should evaluate the ends of the locks, which should have a flat
surface.
Installation of the starter strip (J-profile)
The
J-profile is used for laying the bottom strip. Outside, the bar has a side that
keeps it from falling out. To attach the guide, determine the bottom line of
the position of the finish, and then retreat 4 cm upward and apply a horizontal
line. After that, the bar is applied to the lathing and fastened with screws
through oval holes to wooden or metal beams. The screws are not tightened to
the stop, which allows maintaining the mobility of the profile. Between the
ends of the strips, a temperature gap of 5-7 mm is required.
Fastening corner strips
At the
inner corners of the building, using screws with a pitch of 25-30 cm, it is
necessary to attach a rail or J-bar, the lower border of which corresponds to
the position of the starting profile. To improve installation, it is allowed to
cut the mounting flange from the corner to a height corresponding to the size
of the starting pad.
When
building up the profile in height, it is necessary to cut the flanging from the
upper bar by 3 cm, and then overlap the parts by 2-2.5 cm (the front part of
the upper bar overlaps the lower one to ensure water drain).
Some
craftsmen use the installation of a pair of J-planks located on the sides of
the inner corner. The technology provides an improved appearance of the finish,
but it is impossible to seal the joint line between the elements. Water
entering the gap freezes and destroys plastic or metal. Attempts to minimize
gaps result in damage to parts due to thermal deformations.
H-profile
The profile
is installed vertically and fixed to the lathing with nails or screws. The
element allows you to neatly connect the planks and protects the joint line
from precipitation. When installing the H-profile, a gap of 5-6 mm is
maintained (in winter, the parameter is increased to 10 mm). The element allows
you to connect plates with different widths. The joint obtained has high
rigidity.
The lower
edge of the profile must be positioned 6 mm below the edge of the starting
pads. If there is a protruding foundation under the bulkheads of the house,
which prevents thermal expansion, then a gap between the edges of 5-7 mm is
provided between the end of the guide and the concrete bases. It should be
borne in mind that if the walls of the house have a length less than the
dimensions of the planks, then the H-profile is not used.
Extending panels
If the
length of the elements is not enough to seal the wall of the house, then it is
necessary to connect the blanks according to the following methods:
- Installation
using an H-shaped profile, fixed to the batten and forming a rigid joint.
- By
overlapping. Before joining, the fastening frame is cut from the part to a
length that overlaps the central sections by 2-2.5 cm and the gap between the
edges of the frames is within 12 mm. The frames are cut with scissors according
to the marked markings, the burrs are removed with a knife or an abrasive tool.
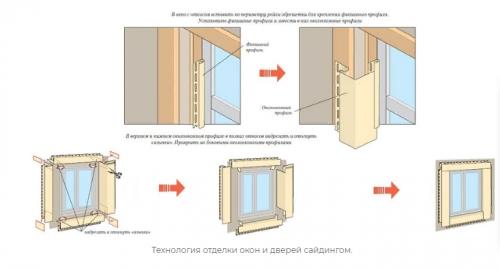
Framing door and
window openings
The
techniques for bypassing openings for window or door blocks are identical, but
drips must be installed on the windows to drain water. The technology of
strapping openings depends on the deepening of the frame relative to the plane
of the wall. If the window opening is located in the same plane with the
partition, then use platbands with grooves to install the edges. They are
attached to the crate until the house is sheathed. Before finishing the
openings, the bars and a layer of synthetic or natural insulation are mounted
(the work is performed simultaneously with the installation of the frame on the
walls of the house).
For
openings up to 20 cm deep, J-strips are used, which are attached to the installed
siding, and the finishing profile is mounted on the window or door block.
The gap around the perimeter of the opening is filled with strips. For deepened
openings, you will need to mount a universal plank around the perimeter of the
block, insert siding elements and arrange the outer edge of the opening with a
complex angle.
The final
cladding of the walls of the house is carried out after the completion of the
procedure for the design of window or door openings.
Laying the finishing strip
The
finishing end strip allows you to shape the edge of the finish panel and fix
the position of the part. The plank is fixed to the lathing horizontally, and
on the last plate, an edge with holes is cut off for fixing with nails. On the
slabs, it is necessary to make incisions with a length of 20-30 mm in
increments of 20-25 cm, the petals are bent forward. The petals ensure a snug
fit when the finish bar is installed.
Installing the
pediment
The
pediment is finished by analogy with the vertical planes, observing the gaps to
compensate for thermal deformations. Installation begins from the center line
along a pre-installed crate with a layer of thermal insulation.
To trim the
material along the upper edge, a rectangular wooden or metal template is used,
which is moved along the J-profile attached to the slopes. To strengthen the
upper section, it is allowed to install a screw through a hole drilled in the
body of the part. There is no other way to fix the bar.
The nuances of laying siding under the roof
To install
the top panel located under the roof overhang, you must:
- Fasten
the finishing profile to the edge of the wall.
- Using a
ruler or tape measure, measure the distance between the lock of the top panel
installed on the partition and the inner plane of the groove in the fixing
profile.
- Transfer
dimensions, taking into account the technological gap of 1-2 mm (allows you to
compensate for temperature deformations or measurement errors).
- Cut off a
part of the workpiece with a lock with a hacksaw or an abrasive wheel installed
on an angle grinder.
- Cut the
hooks on the installed strip (gap between the petals 200 mm), and then bend the
cutouts to the front side.
- Install
the finish panel and close the lock by pulling the element upwards.
Post Your Ad Here
Comments