How to Turn Off Form Autofill in Google Chrome?

Google has offered several useful apps for people all around the globe, and one of these said apps is Chrome. Chrome is a dynamic web-browser manufactured and developed by Google. It offers numerous handy features like auto-fill, password saves, and third-party extensions. So, here are the steps to turn off form Autofill in Google Chrome.
Disable Autofill in Google Chrome through Settings
If you want to disable Autofill in Google Chrome through the settings section, then you can follow the provided steps.
- First of all, you have to open the Chrome browser.
- After that, go to the Settings icon on the upper right-hand side of the browser’s screen.
- Navigate to the menu and choose Settings.
- Also, you can enter the Settings section by inputting “chrome://settings/” into the address box.
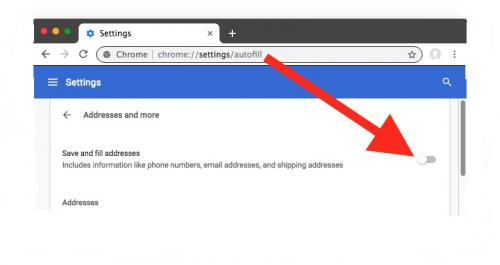
- Then you should move down until you reach the Autofill section.
- Go to Addresses and More.
- Now, switch the “Save and fill addresses” to “Off”.
Remove Unwanted Autofill Entries in Google Chrome
If you want to remove unwanted Autofill entries in Google Chrome, then pursue the instructions given below.
- Get started by launching Chrome on your system.
- Then you should select the Settings icon in the upper right-hand side of the browser’s screen.
- Go to the options and choose Settings.
- After you reach the Settings screen, move down until you see the Autofill section.
- Go to the Addresses and More.
- If you would like to clear the stored addresses, then select the Options icon, that looks like a vertical ellipsis menu icon.
- Now, you should go to the context menu and choose Remove.
Delete Autofill Data through the Remove Browsing Data Section
If you want to delete Autofill data, then you can follow the provided steps.
- To get started, open the Chrome browser on your system.
- You have to select the vertical ellipsis menu icon.
- After that, you should go to the menu and choose Settings.
- Navigate to the Advanced option.
- Thereafter select the Privacy & Security and then choose Clear Browsing Data.
- Later, ensure that you are on the Advance option.
- Go to the options and choose Autofill Form Data.
- Also, you can choose other things you would like to remove.
- Now, click on Clear Data.
Edit Autofill Entries
If you want to edit Autofill entries, then pursue the instructions given below.
- First, you have to open Chrome on your system.
- After that, go to the vertical ellipsis menu icon.
- You have to choose Settings.
- Later, navigate to the Autofill field and select Addresses and More option.
- Now, you should choose the Options icon next to the entry and then go to the menu and choose Edit.
Ashley Miller is a Mcafee product expert and has been working in the technology industry since 2002. As a technical expert, she has written technical blogs, manuals, white papers, and reviews for many websites such as mcafee.com/activate.
Post Your Ad Here
Comments