Top Tips for Achieving Stunning Prints with RC Photo Paper

I feel happy when I see my photos printed on rc photo paper. Koala’s premium paper makes my pictures look bright and clear. I choose the best paper, get each photo ready, and set up my printer. I handle prints carefully and finish them the right way. This helps every print stay nice. Koala’s paper dries fast and is strong, so I do not worry about smudges or scratches.
Key Takeaways
Pick the right RC photo paper finish. Glossy gives bright, sharp colors. Satin looks softer and stops fingerprints better.
Use images with high resolution, about 300 dpi. Make sure colors are managed well. Calibrate your monitor and use ICC profiles. This helps prints look real.
Set your printer for the paper finish you picked. Use high-quality ink. This makes prints sharp and colorful. It also stops smudges and dull colors.
Keep photo paper in a safe place. Store it in acid-free, cool, and dry spots. This keeps prints fresh and safe from harm.
Let prints dry all the way before touching them. Use gloves or clean hands. Show photos with acid-free mats and UV-protective glass. This keeps colors bright.
Choosing RC Photo Paper
Types and Finishes
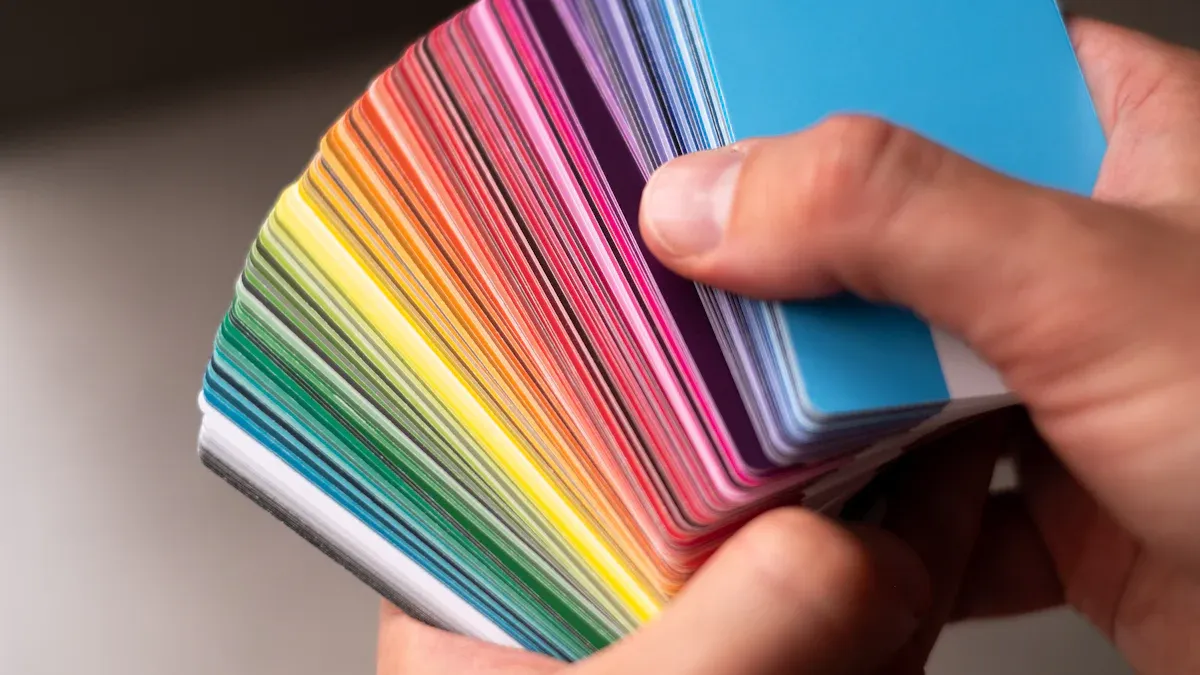
When I pick rc photo paper, I always think about the finish first. Koala gives me two great choices: glossy and satin. Glossy paper has a shiny, smooth surface. My photos look extra bright and sharp on it. Colors pop, and details stand out. But glossy paper can show fingerprints and glare if I touch it or put it under bright lights. Satin paper feels softer and has a gentle shine. It still shows colors well but does not reflect as much light. I like satin when I want a more natural look or when people will handle the prints a lot. Satin also hides fingerprints better.
Here’s a quick table to help you compare:
Feature | Glossy Finish | Satin Finish |
|---|---|---|
Surface Reflectivity | Highly reflective, shiny | Semi-gloss with moderate reflectivity |
Color Vibrancy | Vibrant, sharp, high contrast | Balanced vibrancy with softness |
Fingerprint Resistance | Prone to fingerprints and smudges | More resistant to fingerprints and smudges |
Glare and Reflections | High glare, can affect viewing in bright light | Reduced glare and reflections |
Durability | Less durable for handling due to smudges | More durable and versatile for handling |
Best Use | Photos needing vivid colors and sharp details | Versatile use, suitable for various lighting |
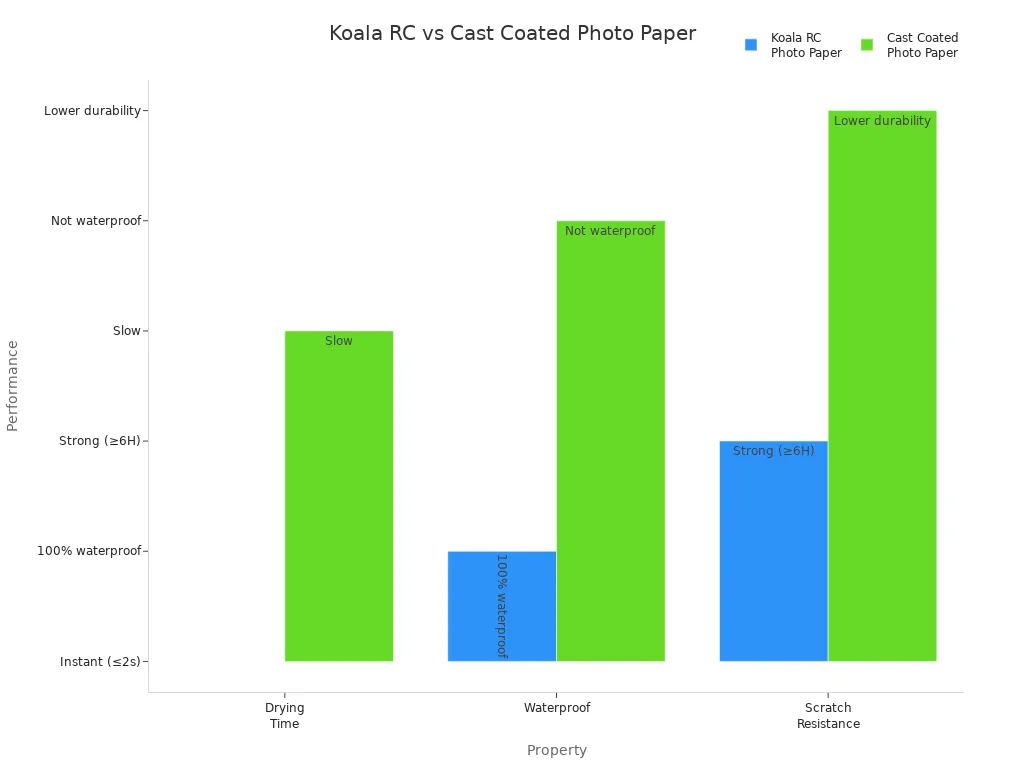
Koala’s rc photo paper uses a double-sided resin coating and a microporous layer. This means ink dries fast, colors stay bright, and the paper resists water and scratches. My prints always look sharp and last a long time.
Weight and Size Options
I like that Koala offers rc photo paper in many weights and sizes. Heavier paper, like 210-300gsm, feels thick and strong. It works well for big prints or when I want my photos to feel special. Lighter paper is good for everyday prints or when I need lots of copies. The size matters too. Small sizes fit in albums or frames on my desk. Large sizes look amazing on walls or in galleries.
I always match the paper size to my photo. This way, I do not lose important parts of the image. The right weight and size make my prints look and feel just right.
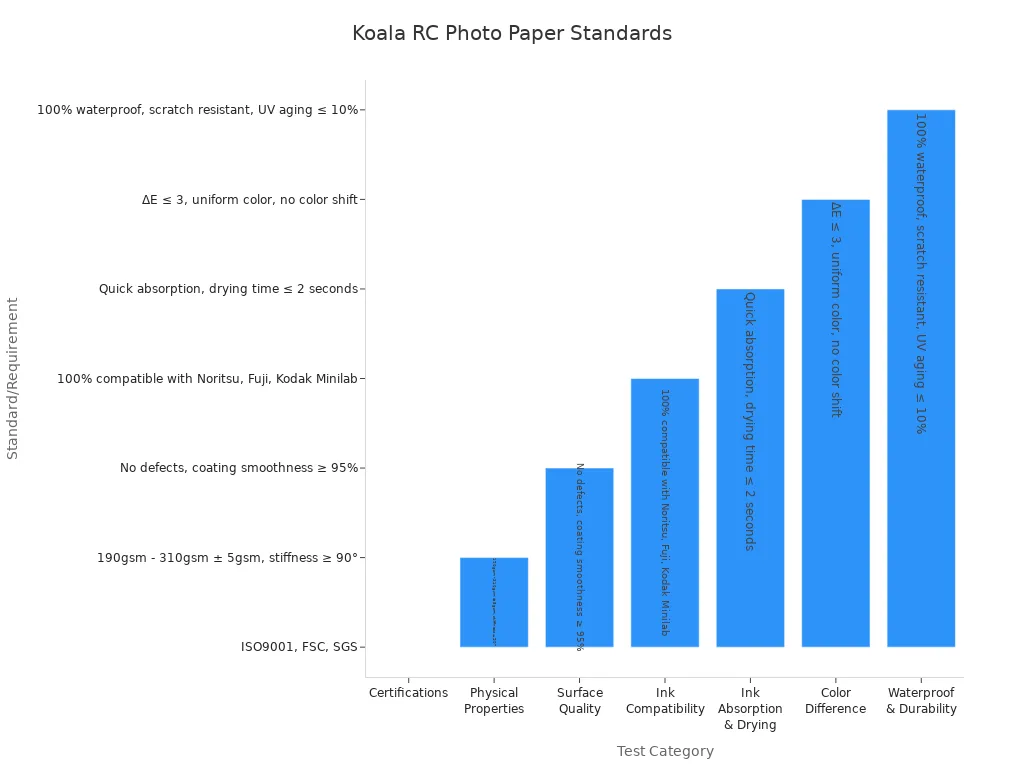
Koala tests every batch for thickness, smoothness, and color. The paper meets top standards like ISO9001 and FSC. I trust that every sheet will give me professional results.
Tip: I always choose the finish, weight, and size based on how I want to display my photos. This helps me get the best results every time.
Preparing Images for Print
Resolution and Size
When I get ready to print my photos on Koala RC photo paper, I always check the image resolution first. High resolution makes a big difference. I aim for 300 dpi (dots per inch) for most prints. If I use my Epson printer, I sometimes go up to 360 dpi for extra sharpness. To figure out the right image size, I multiply the print size in inches by the dpi. For example, if I want a 16x12 inch print at 300 dpi, I need an image that is 4800x3600 pixels. If I want borders, I subtract the border size before I do the math. Getting the resolution right keeps my prints crisp and avoids any pixelation.
Tip: After resizing, I always apply a little sharpening. This helps keep the details clear and the photo looking its best.
Color Management
Color can make or break a print. I learned that what I see on my screen might not match what comes out of the printer. To fix this, I calibrate my monitor. I set the brightness to about 105 cd/m², which works well in my room. I also use a white background in my editing software. This helps me judge the brightness and contrast better. I use ICC profiles for my printer and Koala RC photo paper. These profiles help my printer know exactly how to mix the colors for the paper. When I soft proof my images, I can see how they will look on the actual paper before I print.
Editing for Print
Before I print, I always make a few final edits. I adjust the brightness, contrast, and color balance in my editing software. I save my images as TIFF or PNG files to keep all the details and colors. I check that my photo matches the paper and ink I plan to use. Using the right color profile makes my prints look vibrant and true to life. I let my prints dry completely before I touch them. Koala RC photo paper dries fast, but I still give it a minute to be safe. This way, my prints stay clean and sharp every time.
Printer Settings for RC Photo Paper
Printer Profiles
When I want my prints to look their best, I always start by choosing the right printer profile. Printer profiles tell my printer how to mix colors for the paper I use. If I use Koala RC photo paper, I look for a profile that matches glossy or satin finishes. Most printers, like Epson, Canon, and HP, let me pick a profile in the print settings. I check my printer’s manual or search online for the best match.
Sometimes, I notice color shifts or my prints look different under certain lights. This can happen because of chemicals called Optical Brightening Agents (OBAs) in some papers. OBAs make the paper look extra white indoors, but they can cause colors to change over time or under UV light. To avoid surprises, I look at my prints in both indoor and natural light. If I plan to display my photos, I use UV-protective glass to keep colors stable.
Tip: I always use high-quality ink cartridges made for photo printing. This helps my printer show colors accurately and keeps my prints looking sharp.
Paper Type Settings
Picking the right paper type setting is super important. When I print on Koala RC photo paper, I choose “Glossy Photo Paper” or “Satin Photo Paper” in my printer’s settings, depending on the finish I use. This tells my printer how much ink to use and how fast to print. If I pick the wrong setting, my prints might look dull or the ink might not dry properly.
Here’s a quick table I use to remember which setting goes with which finish:
Koala RC Photo Paper Finish | Printer Paper Type Setting |
|---|---|
Glossy | Glossy Photo Paper |
Satin | Semi-Gloss or Satin Photo |
Koala RC photo paper works with most inkjet printers, including home and professional models. I use both dye and pigment inks, and the paper handles them well. The 250 gsm weight feels sturdy and gives my prints a professional touch.
Note: I always double-check my settings before I hit print. This saves ink and paper, and helps me get the results I want.
Calibration Tips
Getting colors just right can be tricky. I learned a few tricks from printer experts and photographers. First, I rent a colorimeter instead of buying one. Some local photo clubs let me borrow one for a day. This tool helps me calibrate my printer so colors match what I see on my screen.
Here are my favorite calibration tips:
I use a colorimeter to set up my printer for accurate colors.
I adjust my printer’s color profiles and print quality to match Koala RC photo paper.
I check my printer’s manual or online guides for recommended settings.
I always use high-quality photo ink cartridges.
Sometimes, I see color changes in my prints. This can happen if I use paper with OBAs or if I display prints without UV protection. I keep my prints away from direct sunlight and use UV filter glass when I frame them. This keeps colors bright and true for a long time.
Tip: I test my settings with a small print before I make a big one. This way, I can fix any problems and save time and materials.
Handling and Printing Tips
Storing RC Photo Paper
I always make sure to store my rc photo paper the right way before I print. Good storage keeps the paper fresh and helps my prints look their best. I use acid-free boxes and sleeves made from safe plastics like polyester or polypropylene. These materials protect the paper and pass the Photographic Activity Test, so I know they won’t cause damage over time.
Here’s how I keep my photo paper safe:
I use acid-free, archival-quality boxes or folders.
I store each sheet in its own enclosure to avoid scratches.
I keep the paper in a cool, dry place. I aim for a temperature around 68°F and humidity between 30% and 40%.
I avoid sunlight and keep the paper away from ozone and pollutants.
I never stack heavy boxes on top of my photo paper.
I use support boards for large sheets to prevent bending.
I organize my paper by size so nothing gets crushed or curled.
Tip: I add a small packet of desiccant in the box to control moisture. This keeps the paper flat and ready for printing.
Here’s a quick table I use to check my storage setup:
Condition | Recommended Range |
|---|---|
Temperature | 68°F (20°C) |
Relative Humidity | 30–40% RH |
Enclosure Material | Acid-free, archival-quality |
Storage Orientation | Flat or vertical |
Loading and Printing
When I load rc photo paper into my printer, I pay close attention to avoid jams or misfeeds. I always check that the photo side faces the right way. I clean the printer rollers often to remove dust and ink residue. This helps the paper feed smoothly.
Here’s my step-by-step routine:
I load one sheet at a time, especially with thick paper.
I use the manual feed slot if my printer has one. This gives me better control.
I adjust the paper guides so the sheet stays straight.
I never overload the tray. Too much paper can cause jams.
I set my printer for photo paper or cardstock to match the thickness.
I double-check the settings before I print.
Note: I always feed the photo side first. This prevents head strikes and keeps the print surface clean.
Avoiding Damage
I handle my prints with care, especially right after printing. Wet prints can tear or scratch easily, so I let them dry before touching. Koala RC photo paper dries almost instantly, so I don’t have to wait long. The waterproof and scratch-resistant coating protects my prints from spills and rough handling.
Here are some things I do to keep my prints safe:
I never touch the print surface with bare hands. I use cotton gloves or hold the edges.
I keep humidity low to prevent mold or sticking.
I avoid stacking prints until they are completely dry.
I use acid-free mats and frames for display.
I keep prints away from direct sunlight and use UV-filter glass for framing.
Koala RC photo paper stands out because it dries in less than two seconds, resists water, and has a tough surface. I can handle my prints right away without worrying about smudges or scratches. This makes it perfect for albums, exhibitions, and gifts.
Tip: I always use stable, reversible mounting methods. I avoid glue or tape that can damage the paper over time.
Finishing and Display
Drying Prints
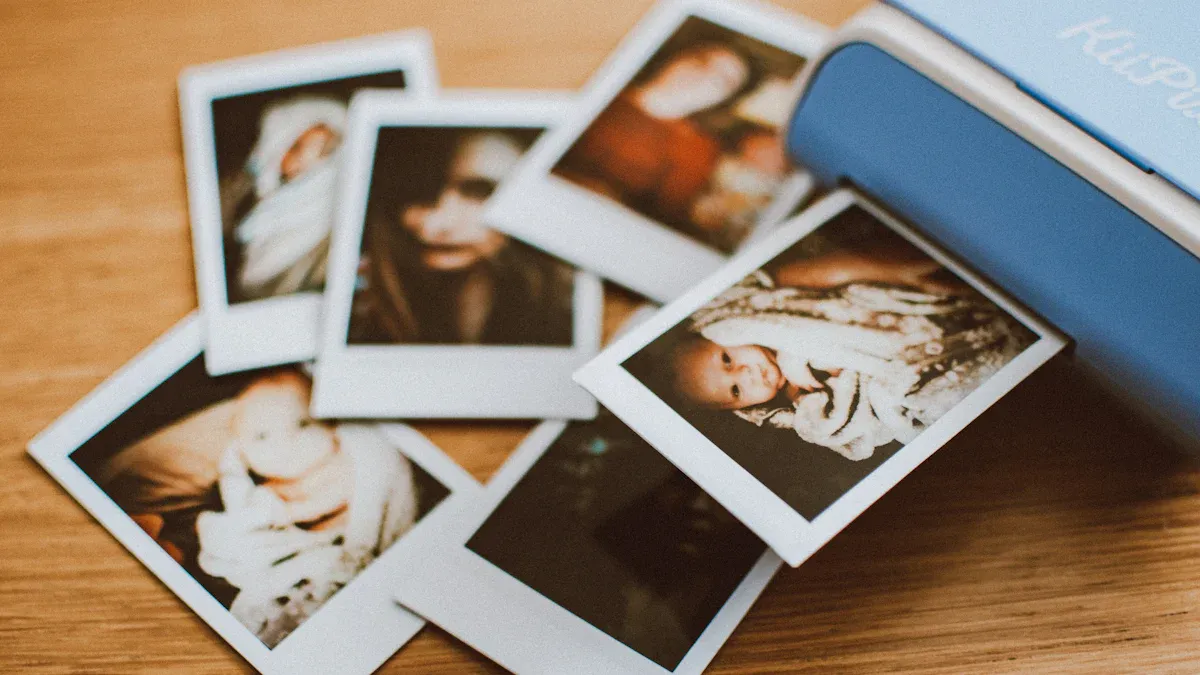
When I finish printing, I check if my photos are dry. Koala RC photo paper dries fast. I can touch the prints almost right away. The resin coating helps the ink set quickly, so I do not worry about smudges. Even though the prints feel dry, I let them sit for a few hours. This gives the colors time to settle. Experts say that prints on rc photo paper are dry to the touch in just 2-3 hours. Fiber-based papers take much longer and often curl. I like that Koala’s paper stays flat and ready for albums or frames.
Paper Type | Drying Time (Air Dry) | Handling Notes |
|---|---|---|
RC (Resin-Coated) | Approximately 2-3 hours | Quick drying; less curling; easy to handle soon after printing |
Fiber-Based | Around 24 hours | Longer drying; prone to curling; needs careful drying |
Tip: I always wait at least a few hours before framing or stacking my prints. This keeps the colors bright and the surface clean.
Handling After Printing
After my prints dry, I handle them with care. I wash my hands or wear cotton gloves. This keeps fingerprints and smudges away. I use acid-free sleeves or albums to store my photos. I keep them in a cool, dry spot, far from sunlight. This helps my prints last longer and look fresh. I never stack wet prints. I let each one dry fully before I put them together.
I use clean, dry hands or gloves.
I store prints in acid-free sleeves.
I keep prints away from heat and light.
Note: Koala RC photo paper’s tough coating protects my prints, but I still treat them gently.
Display and Storage
When I want to show off my photos, I pick the right frame and mat. I use acid-free mats and boards. These keep my prints safe from acid damage. I like photo corners and hinge mounts because they do not use glue. This means I can change the frame later without hurting the print. For big displays, I use foam boards to keep the photo flat. I avoid glass unless I need to protect from bugs. If I use glass, I pick UV-filter glass to keep colors true.
Acid-free mats and boards protect prints.
Photo corners and hinge mounts let me reframe easily.
Foam boards help keep prints flat.
I avoid laminating because it can damage prints over time.
Tip: I store my framed prints in a cool, dry place. This keeps them looking new for years.
Printing with rc photo paper is fun when I use good tips. I choose the best paper for my photos. I make sure my printer is set up right. I edit my pictures so the colors look real. I try out different settings and finishes to see what works. Other people also test clear coats and ways to mount their prints.
Charles Pratt said, “Printing transforms the captured experience into a photographic image.”
I hope you will share your tips or ask questions. Let’s work together to make prints that look great and last a long time!
FAQ
How do I know which side of Koala RC Photo Paper to print on?
I always look for the brighter, smoother side. That’s the print side. If I’m not sure, I check the packaging or do a small test print. The print side gives me the best color and sharpness.
Can I use Koala RC Photo Paper with any inkjet printer?
Yes, I use it with my Epson and Canon printers. It works with most inkjet brands. I just make sure to select the right paper setting for glossy or satin. Both dye and pigment inks work great.
What should I do if my prints come out with dull colors?
I check my printer settings first. I pick the correct paper type and use the right ICC profile. Sometimes, I recalibrate my monitor. If I still see dull colors, I try a different ink cartridge.
Tip: Always use high-quality photo ink for the best results!
Is Koala RC Photo Paper safe for long-term storage?
Yes, I store my prints in acid-free sleeves or albums. The paper is acid-free and meets archival standards. My photos stay bright and sharp for years.
Can I write on Koala RC Photo Paper?
I use a permanent marker if I need to write on the back. Regular pens might smudge. I let the ink dry before stacking or framing my prints.

Post Your Ad Here
Comments