 Articles
How to Troubleshoot QuickBooks Error code 5502?
by James Ryter QuickBooks Error 6130QuickBooks error 5502 prevents
users from using online services. When Quickbooks is unable to connect to the
server, this error appears on the system. It could be caused by anything from a
third-party application to flaws with your systems. Two distinct versions of
the QuickBooks error message 5502 may show up on your screen:
“Sync is not
completed properly”
“QuickBooks
data has been uploaded, but failed to connect via the server”.
A Brief Review of QuickBooks Error 5502
QuickBooks customers can increase
the size of their files as their business grows. The user may get Intuit QuickBooks
error code 5502 on the screen when they alter the file size, though. This
problem could appear if the sync manager is faulty or if QuickBooks can't
connect to the server. The error message claims that the sync failed or was
left unfinished, or that QuickBooks data was saved but couldn't connect to the
server. This problem may be caused by a number of factors, so we must
investigate them to comprehend and address the causes appropriately.
Causes of QuickBooks Error Code
5502
As we already noted, there are a
variety of causes for QuickBooks error code 5502, including system
failure or user error. Here is a comprehensive list of all potential causes:
●
Document
augmentation for the company is modified.
●
Name of the
expansion record.
●
Physical
changes have been made to QBB in Mac.
●
Expansion
records with incorrect renaming in Windows, such as .QBM,.QBB, or.QBX.
●
Your company
file is corrupted.
●
The issue is
due to a third-party application.
●
Having
trouble connecting to the internet
Methods to Resolve QuickBooks
Desktop Error 5502
The most effective ways to resolve
error 5502 in QuickBooks have been listed and explained in this section.
Method 1: Modify the Company File's Extension and Location
It is possible to repair a
corrupted company file by relocating it and changing its extension. The way you
must deal it is as follows:
●
On your
desktop, perform a right-click and select Folder from the New drop-down menu.
Put "Test" in the folder name.
●
Navigate now
to the directory or drive that contains your QB company file (with the .qbw
extension).
●
Select Copy
from the context menu when you right-click on the file.
●
Move the
cursor over the Test folder, then select Paste from the context menu.
●
Right-click
on the file and choose Rename to change the extension from.qbw to.qbm.
●
On your
keyboard, hold down the Ctrl key while you double-click the QB icon.
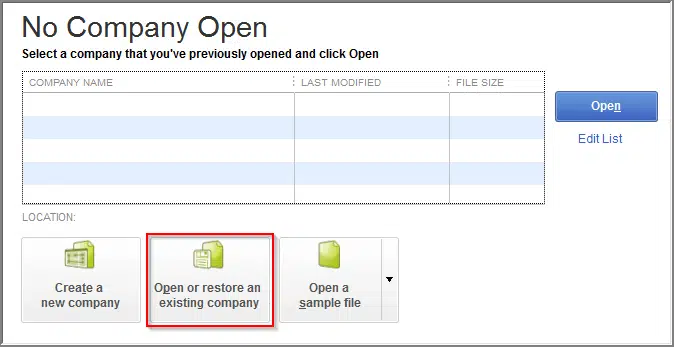
● Release the key only when the No Company Open window pops up.

●
Choose the
option to "Open or restore an existing company file”.
●
Then, search
your file in the Test Folder and open it.
●
Change the
file's extension back to.qbw when it has been opened, then repeat the
procedure. This should correct the issue.
Method 2: Use the QuickBooks Database Server Manager to
its true capacity
You can easily work on the company
file in the multi-user mode using the QuickBooks Database Server Manager. To fix the issues brought on by QuickBooks error message 5502,
you must launch the Database Server Manager.
●
Access QuickBooks Desktop by going to your server PC.
●
After
selecting the File tab, select "Open or restore company" from
the menu.
●
Locate your
data file by selecting Open a Company File and continue.
●
Choose "Open
file in multi-user mode" and then select the Next button.
●
Click Open.
●
Open the File
menu once more after logging into your data file using your credentials.
●
After that,
click "Close Company/Log Off" and allow for the server to
close the file.
●
To access the
search panel, tap the Windows icon.
●
Enter
QuickBooks Database Server Manager and choose to launch a new window from the
menu.
●
Select Scan
Folders and then click Browse.
●
Select the
folder where your company file is kept, then click OK.
●
Once this is
finished, click Start Scan to start the process and attempt to access your
company file.
Method 3: Run a Clean Installation of QuickBooks Desktop
It is preferable to uninstall QBDT
and reinstall it if nothing else resolves the issue. This will update the QuickBooks software to its most recent version and fix any faults that may have existed
●
By going to
your computer's Programs and Features box, uninstall QuickBooks.
●
Go to the
Start menu's search panel by tapping the Windows icon.
●
To open a new
window, enter File Explorer and select the option.
●
Find your QB
company file folder; it can be one of the following:
C:\ProgramData\Intuit\QuickBooks
(year)
C:\Users\(current
user)\AppData\Local\Intuit\QuickBooks (year)
C:\Program Files\Intuit\QuickBooks
(year)
64-bit version C:\Program Files
(x86)\Intuit\QuickBooks (year)
●
To rename a
folder, select it using the right mouse button.
●
After adding
OLD to the folder name, hit the Enter key.
●
Install
QuickBooks again and see if the issue still exists.
Method 4: Rename the .ND file
Replace the names of your damaged .ND
and.TLG files to enable QuickBooks to generate new files. Do as follows:
●
Navigate to
the folder where you saved the company file.
●
Locate the
document with the .ND extension. It would be similar to companyfilename.qbw.nd.
●
Right-click
this file now and select Rename from the menu.
●
To make
companyfilename.qbw.nd into companyfilename.qbw.nd.old, add .OLD to the end of
the filename.
●
Once you
press Enter, the renaming process is complete. Check your files immediately to
determine if the error 5502 still exists.
You may also read: How to Fix QuickBooks Error Code 6123 0?
Despite the fact that QuickBooks
is an excellent program, errors like QuickBooks error 5502 inevitably
make using it more difficult.
We really hope that the
aforementioned blog post was useful to you in learning more about the issue and
assisting you to permanently fix it. Contact our quality QuickBooks error support team at 1-800-761-1787 whenever you need more assistance in
following the instructions.
Sponsor Ads
Created on Apr 4th 2023 06:19. Viewed 240 times.

