 Articles
Fixing QuickBooks Error H101 Without any Technical Proficiency
by Joey Williams QBS Enterprise SupportQuickBooks Error H101 belongs to the subset
of Error of the format “QuickBooks Error Hxxx”. These technical
aberrations in the form of certain warning messages are generally encountered
as users try accessing the files over the multi-user mode. Some major causes of
this error include misconfigured settings in the multi-user mode or incorrect DNS
settings. The walkthrough discussed within the ambit of this blog should be
helpful for fixing QuickBooks Error H101.
Steps to Follow for fixation of QuickBooks Error H101
The user can perform the below steps to fix
the QuickBooks error code H101.
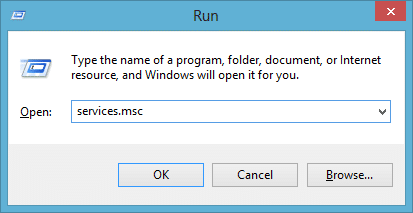
Step 1: Verifying the services linked with QuickBooks
•
This step directs the user to
hit on the Windows key and the R key together. This will reveal the Run window.
•
Follow up by typing "services.msc"
within the Run and then proceed by hitting Enter.
•
In the new window that pops up,
the user should search for the QuickBooks DBXX service.
• Upon locating the service, the next step requires checking if both the startup type and service status are actively running.
• Follow up by heading to the Recovery tab and opting to restart the service.
•
Subsequently, tap on Ok tin
order to save the settings.
•
The user is required to repeat
the same steps in case of the QBCF Monitor service.
•
Once done with the steps discussed
here-to-fore, the user should re-run QuickBooks and try accessing the Company
file in the multi-user mode again.
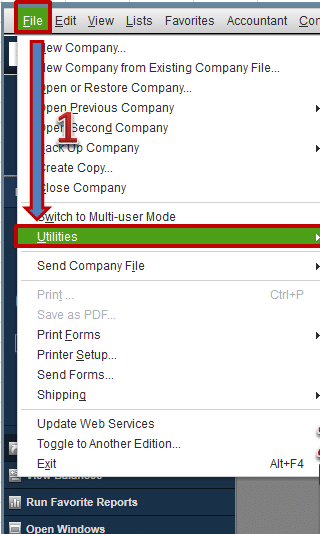
Step 2: Check the settings of the Host
•
The initial step requires launching
QuickBooks on each workstation.
•
First, tap on the File menu and
then follow up by clicking on Utilities.
•
Soon after, tap on the option
to enable hosting multi-user mode on each system.
• Afterwards, make a choice for stopping the hosting for multi-user access.
•
The same set of steps need to
be followed for all the different systems.
Step 3: Creating and Sharing a New Company File Folder
•
This process first requires the
user to create a new folder, preferably on the Desktop.
•
Now, the user needs to share
this folder on the hosting computer, and also make sure that the settings
related to sharing are configured correctly.
•
Following that, proceed by copying
the Company file from its original folder and pasting it to this new folder.
•
Finally, open the company files
in multi-user mode.
Step 4: Run QuickBooks File Doctor Tool
You can use the QuickBooks tool hub program
to make use of the QuickBooks File Doctor Tool.
· Download and install the tool.
·
After that, open the tool by
double-clicking on its desktop icon.
·
Now, choose the file doctor
tool.
·
Allow it to run its diagnosis.
·
This process might take a
while.
Step 5: Access QuickBooks Database Server Manager
•
At first, open the QuickBooks Tool Hub,
which should already be installed in the previous step.
•
Now, advance to the Network
Issues tab.
• From there, the user is required to click on the QuickBooks Database Server Manager tab.
•
Follow up by clicking on Browse
and then opting for the suspicious company file that was inciting Error code H101.
•
Wait for the process to end.
Once it is accomplished, try accessing the Company file once again in the
multi-user mode.
Conclusive Lines!
The above-mentioned set of steps should effectively
resolve QuickBooks Error H101. If you come across any issues in this
context, just give our certified QuickBooks error support professionals a phone call at the toll free number i.e., 1-800-615-2347.
Sponsor Ads
Created on Jul 14th 2023 06:56. Viewed 97 times.

