Solved: 0xA00F425D (0x80131500) VideoCaptureStartFailed Error
The error message 0xA00F425D (0x80131500) VideoCaptureStartFailed might appear due to certain reasons and the causes are not apparent. It mostly occurs on the Windows 10 operating system, and that can be really painful when once faces it while trying to accomplish an important project. It is reported that the issue is volatile and triggers anytime over the screen. Moreover, it makes it hard to do any work on the system. Sadly, most of the users who have posted the problem on the Microsoft Support forum didn’t get any response till now. In case you are also facing the same 0xA00F425D (0x80131500) VideoCaptureStartFailed on your system, worry not. We have got your back! Just carry on this article, and we would be able to help you out.

SOURCE:-Solved: 0xA00F425D (0x80131500) VideoCaptureStartFailed Error
Solution 1: Running and downloading Windows Updates
Here are the steps to resolve the error code 0xA00F425D (0x80131500) on your device:
- Navigate to the Start menu.
- Then search for settings in the start menu search bar.
- Head to Settings from the search results.
- Then, head to Updates and Security.
- Now navigate to Check for Updates.
- You would now see a link saying Checking for updates.
- All you have to do is tap on it to run the updating process.
- Now when the update check is complete, download and install all of the available updates to your system.
- Now once the message saying Your device is up to date. Last checked: Today appears, it indicates that all of the required updates have successfully updated.
Solution 2: Removing Recently Installed Windows Updates
In case you are still facing the 0xA00F425D (0x80131500) error code, then follow the instructions mentioned down here to solve it instantly:
- Make a combination of the keys with Windows key + I to open Settings.
- Navigate to Update & Security.
- Then, head to View installed update history.
- In the succeeding window, make a press on Uninstall updates on the upper of the screen.
- Distinguish between the recently updated patches; make a right-click on an update to uninstall it.
- Make a press on Uninstall.
- At last, reboot the PC and then ensure if the error is resolved or not.
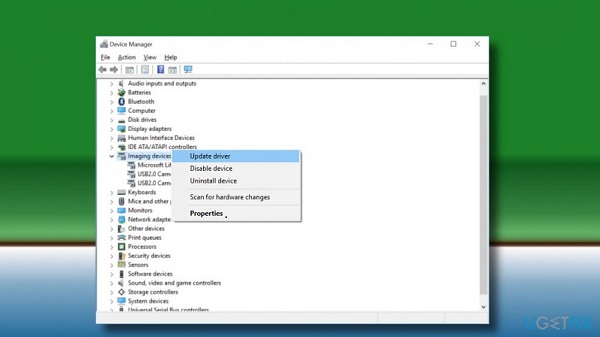
Solution 3: Fixing the Imaging Drivers
In case the issue persists on your computer, you should try another way of fixing the issue. Try the below-mentioned instructions to solve the 0xA00F425D error code:
- Head to Start menu by pressing the start menu key on your keyboard.
- Now put in Device Manager.
- On the best matching result, make a right-click on it.
- When the Device Manager appears, open the imaging devices.
- Then make a right-click on its drivers one by one.
- Head to the option saying, Update driver.
- Now in the succeeding window, head to Browse my computer for software driver.
- Next, you should make a click on the Let me pick from a list of device drivers option on my computer option.
- There is an option named Show compatible hardware, and you need to mark the box that is situated next to it. In case the option is selected already, then leave this step.
- Now pick the USB Video Device.
- Make a tap on the Next option.
- The updating process will now proceed further, and once it completes, reboot the system.
Solution 4: Via Editing Windows Registry
The issue might even show up when you have performed all of the above settings since the root of it may remain unchanged with these basic troubleshooting methods. In order to solve the VideoCaptureStartFailed error message, follow these instructions:
- Head to the Windows Registry Editor by pressing the Start + R keys at the same on your keyboard.
- Put in the regedit command in the Run the dialogue box, and then head to OK.
- Now make your way to the HKEY_LOCAL_MACHINE\\SOFTWARE\\Microsoft\\Windows Media Foundation\\Platform key folder using the navigation menu on your left side.
- Once you get there successfully, find the folder named as Platform and then make a right-click on it.
- Head to New > DWORD.
- Now edit the name with EnableFrameServerMode.
- Now on the newly developed value, make a right-click.
- Then pick the Modify option.
- Replace its Value data by 0.
- Now head to the HKEY_LOCAL_MACHINE\\SOFTWARE\\WOW6432Node\\Microsoft\\Windows Media Foundation\\Platform folder directory using the left menu.
- Then make a right-click on Platform.
- Navigate to New > DWORD.
- Change the name to EnableFrameServerMode.
- On the newly made value, press your mouse’s right-click.
- Choose the Modify option.
- Edit the Value as 0.
Jack Arona is a Norton product expert and has been working in the technology industry since 2002. As a technical expert, Ava has written technical blogs, manuals, white papers, and reviews for many websites such as norton.com/setup.
Post Your Ad Here
Comments