How to Switch Virtual Memory to an Another Drive on Window 10?
Windows 10 offers countless useful functions and features,
including virtual memory. The function is capable of modifying RAM pages within
the hard drive to facilitate more physical memory. The function has numerous
further pros, and if you wish to avail of them, then we will help you out.
Users can use such esteemed functions by moving the virtual memory to another
drive and enhance system performance. So, here are the steps to switch virtual
memory to an another drive on Windows 10.
Switch Virtual
Memory to Different Drive
If you would like to switch memory to a different drive, then
abide by the given steps.
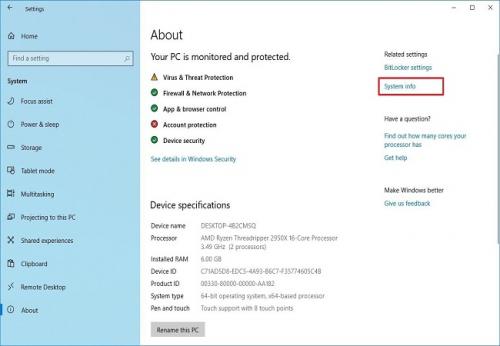
- Go to the Settings option on your system.
- Then select the System option.
- You should click on the About button.
- Beneath ‘Related settings’ field at the right-hand side of the
screen, select ‘System info’.
- You have to choose ‘Advanced system settings’ within the
right-hand side of the screen.
- Beneath the ‘Performance’ field, select the Settings tab.
- Navigate to the Advanced button.
- Beneath ‘Virtual memory’ field, select the Change tab.
- You should untick the box of ‘Automatically manage paging file
size for drivers’.
- Beneath ‘Paging file size for each drive’ field, choose to
drive C.
- Thereafter, choose the option No paging file.
- Go to the Set tab.
- You should click on the Yes tab.
- Go to the drive you would like to use for paging file.
- Navigate to ‘System managed size’.
- Then click on the Set button.
- You have to choose the OK tab.
- Select the Apply tab.
- You should click on the OK tab.
- Now, you have to reboot the computer.
- Finally, after finishing the directions, Windows 10 will make a
new pagefile.sys file automatically, including the virtual memory content
in the new location to advance performance.
Verify Virtual
Memory
If you wish to verify virtual memory, then pursue the given
instructions.
- Navigate to the File Explorer and launch it.
- You should select the This PC within the left-hand side panel
of the screen.
- Beneath Devices and drives field, twice click to launch the
drive which is now saving the paging file.
- You have to select the View button.
- Then tick the box of Hidden items.
- You should click on the Options tab.
- Thereafter choose the View button.
- Beneath, Advanced settings’ field, untick the box of ‘Hide
protected operating system files’.
- You should go to the OK tab.
- Next, click on the Apply tab.
- Later, you have to select the OK tab.
- Finally, verify the present ‘pagefile.sys’ file.
Emily Williams is a Microsoft Office expert and
has been working in the technical industry since 2002. As a technical expert,
she has written technical blogs, manuals, white papers, and reviews for many
websites such as office.com/setup
Post Your Ad Here
Comments