 Articles
How to Fix Time Keeps Changing on Windows 10
by Lucia Mandela softwareThe lower right corner of the computer screen is the most surfing portion for your device, where the date and Time displayed. Although the function is unnoticeable most of the time, its malfunction can cause several errors on your device. In this article, we will teach you how you can fix this issue, “Time Keeps Changing” on Windows 10.
Source: How to Fix Time Keeps Changing on Windows 10
How to Fix Time Keeps Changing on Windows 10
Here are the three ways to fix the issue of “time keeps changing” on windows 10 operating system with straightforward option:
- Selected Wrong Time Zone
- Malware Attack
- Adjust service.msc settings
1) Selected Wrong Time Zone
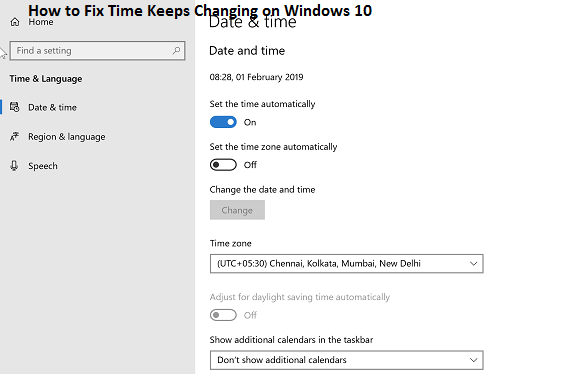
- Right-tap on the system clock in the “Taskbar” and choose “Adjust Time and date.
- After this, you will be taken in the time and date option the settings.
- To launch Settings, tap on start and then hit Time and language, then hit date and Time.
- In “Time zone,” you need to choose the correct time zone that is adjacent to your selected region.
- After this process, your computer automatically set to sync with “time.windows.com” in the time service.
- Here you need to tap on “time & regional or Additional date settings” that appear on the right of your windows in the “Related Settings.”
- This will show you the “Clock and Region” option in the classic “Control Panel.”
- Now in the “Date and time” tap on “set date and time.”
- In the Time and date, option chooses Internet time.
- In the Internet time, you need to choose “computer is set to synchronize with ‘time.windows.com” notification automatically.
- You can also tap on “Change settings” to start “Internet time settings.”
- Choose “time.windows.com” and then tap on “Updates now.
- Tap on “OK” and then tap on Apply then OK to turn off the Time and date.
2) Malware Attack
- Tap start and launch settings.Then tap on Updates and security.
- Choose on the “Windows Security” button that appears on the left of your screen.
- Hit on the “Open Windows Defender security center” option and it will start the “Defender security center” that is served on the top of security settings.
- Make sure is green tick shown as associated with every parameter such as “Virus & threat protection, Account protection, Device security.”
3) Adjust service.msc settings
- Tap Windows + R key together on your keyboard to start Run dialog box.
- Write “service.msc” in the search field and then tap “Enter key on your keyboard to start the Service box.
- In the service, box finds and then right-tap on “Windows Time” and then choose Properties.
- In Properties box set, “Startup setting automatic.”
- You can also make sure to service status to launch when the service is not started.
- Tap on OK or Apply.
Sponsor Ads
Created on Apr 15th 2020 03:01. Viewed 226 times.

Comments
No comment, be the first to comment.
