 Articles
How to Fix Issues When Deactivating Bank Feeds in QuickBooks?
by Sophia Bell Accountants and BookkeepingBank Feeds in QuickBooks provide online banking tools that simplify the process of connecting to financial institutions and downloading transactions. However, there may be instances when users need to disable Bank Feeds. This article presents easy-to-follow procedure to help you understand and address any issues that may arise when deactivating Bank Feeds in QuickBooks.

Reasons for Deactivating Bank Feeds in QuickBooks
There could be several reasons why users might want to deactivate Bank Feeds in QuickBooks. Here are a few methods to accomplish this process.
Method 1: Update QuickBooks to the latest release
- Launch QuickBooks Desktop.
- Select Help and click on "Update QuickBooks Desktop."
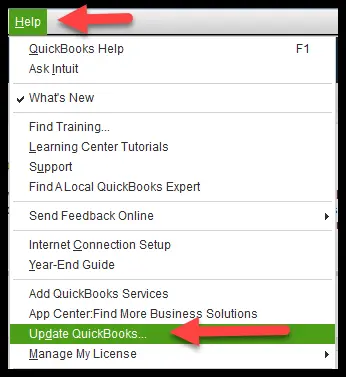
- Choose the "Update Now" option.
- Click on "Get Updates" and wait for the update process to complete.
- After the update finishes, restart QuickBooks and try disabling Bank Feeds again.
Method 2: Use lists to restore the original account order
- Click on the Banking tab.
- Select the option to write checks.
- Click on "Pay to the Order of."
- Press Ctrl and L keys simultaneously.
- Check the box next to "Include inactive."
- Select "Name" from the drop-down menu.
- Choose "Re-sort List" and click on Ok to restore the original order.
Method 3: Rebuild and verify company files
- Click on the File menu, then go to Utilities.
- Select "Verify Data" and click Ok.
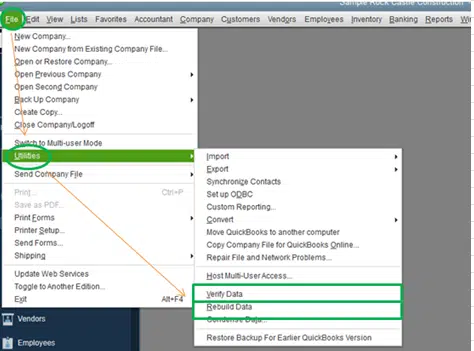
- Wait for the validation process to complete.
- To rebuild data, open QuickBooks and go to the File menu.
- Choose Utilities and then "Rebuild Data."
- Select Ok and follow the on-screen instructions for backup.
- Let the rebuild process complete.
- Try deactivating Bank Feeds to check if the issues have been resolved.
Method 4: Deactivate Bank Feeds using Microsoft Excel
If the previous methods didn't work, you can try manually modifying the file in Excel before re-importing it.
- Select File from the menu and switch to Single-user Mode.
- Export the Chart of Accounts: Click on File, then Utilities, and choose Export.
- Select Lists to IIF Files and pick Chart of Accounts.
- Save the file to the Desktop and minimize QuickBooks.
Steps for Editing the IIF file in Excel
- Press Win + R keys simultaneously to open the Run Command.
- Type "Excel" and click Ok to open Excel.
- Open a blank workbook and go to File, then Open.
- Locate the IIF file, choose All Files, and click Open.
- Follow the Text Import Wizard and click Finish.

- Find QB ONLINE at the bottom of the page.
- Modify Y to N for the following items: OLBANKINGS, OLBILLPAY, OLENABLED, OLTAB.
- Select File, then Save, and click Yes to accept the changes.
Importing the edited IIF File to
QuickBooks Desktop
- Launch QuickBooks Desktop and go to the File menu.
- Select Utilities and choose Import.
- Pick the IIF Files option and click Ok.
- Choose Import IIF and locate the IIF file.
- Select the file, click Open, and wait for the import process to finish.
- Once completed, select Close.
Final Words!
By following the methods mentioned above, you should be able to successfully deactivate Bank Feeds in QuickBooks online. If you encounter any issues, feel free to contact our QuickBooks online error support Team at 1-800-761-1787 for further assistance. Our knowledgeable team is dedicated to providing impeccable support to QB users.
Sponsor Ads
Created on Jun 23rd 2023 01:14. Viewed 161 times.

