PCB Heater-What You Need To Know About
Abstract
PCB heater find a lot of application in soldering PCBs because they offer quality soldiering at reduced temperatures. They also consume less time and reduce the risk of subjecting your PCB to thermal stress. This is critical in helping improve your final results. Preheaters could be used to rework and solder multi-layered boards. PCB heater has two types; the convection preheaters and the infrared preheaters.
Content
1.PCB Heater Design
2.PCB Trace Heater
3.PCB Bed Heater
4.DIY PCB Heater
Convection
They have two convection heating zones that distribute the heat gradually and uniformly to reduce the risk of thermal stress. When using this heater, you will be able to monitor your working. It comes with a thermocouple that monitors the surrounding and protects the neighboring components.
Infrared
The infrared preheaters are suitable for anyone that will be heating small PCBs. It comes with a high heating capacity infrared lamps which provide a fast response and gives a maximum heating uniformly.
Preheating PCBs were introduced in the 1990s. The preheating process is done before reflowing and helps to initiate the cooling down of the solder joints after reflowing. Preheating is critical and helps in the post cooling process. It is essential in helping to enhance the quality of the work done and reduce instances of having to repair the PCBs. It also helps to reduce the need to carry out rework repairs which are sometimes expensive and makes the work done look shoddy.
Notice that elevated heating of between 315°C - 425°C can present problems to your PCB. It can lead to thermal damage, discoloration, bubbling, substrate delamination, and board warping lifted pads and sometimes burning the board. Exposing PCBs to high temperatures can bring more serious problems including failure due to degradation of the components at high temperatures. The failure is caused by unequal expansion of the material due to rapid heating.
If tremendous thermal stress that normally occurs when a PCB is subjected to a high-temperature change of more than 371°C, it can result in degradation of the device. This is why preheating is essential.
Preheating, therefore, eliminates issues with PCB prototyping and thus when done before reflow is done it enhance the quality of work.
Benefits
Preheating comes with a wide range of benefits including allowing you to use lower soldering reflow temperature. This is why wave soldering will always be done at reflow temperatures that are below 500° F. Preheating is also critical since it helps to activate the flux by removing films and flux oxide. This helps to enhance the wetting process and ensures that you end up with better joints. Notice that preheat temperature is normally below the melting point of a reflow, which substantially reduces the delta between the final reflow and assembly temperature. This helps to minimize thermal shock risks.
1.PCB Heater Design
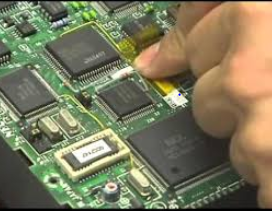
Coming up with a PCB heater design is a simple process which requires that you draw a simple pattern of the components that will be used to make the preheater. Firstly, you need to come up your PCB heater schematics. The next thing you need to do is to create a board on which the circuit will be printed. The circuit should then be transferred to the board using the toner transfer method. This could also be done by placing the paper on the board and ironing it out. The board should then be placed in water and rubbing off the paper until it comes out. You should then remove the leftovers that remain on the PCB. Steel and wool could be used to do this job. You then need to clean the board with acetone so that no bits of the toner remains on the board.
The next thing that should be done is drilling the board. This can be done by using a standard drill or any other tool at your disposal. Two or three holes may need to be drilled using a 1.0mm drill bit. Alternatively, you may also use a screwdriver or any other tool that can give you the desired hole. After drilling, you need to check the continuity of your PCB board. This could be done using a multi-meter. You can get its resistance before heating and compare it with the values you get after heating. To test the heating, you may need a high current power source.
2.PCB Trace Heater
When creating a PCB tracer heater, the length of the trace layout is important. Having a trace length of 2 meters and a width of 0.254 mm can help create a PCB trace. You need to decide between the lengths of the heater dimension and trace separation because they are inversely related. It means that if you increase the size of the heater, the trace will increase and thus, reduces heating uniformity. A good example is where one wants to make a small heater of about 5 cm. In such a case it will require that a trace should go back and forth for about 5 cm. If the trace is 2m, it means that we shall be talking about 40 traces and if we decide to separate it with 2mm, then we end up with a heater that is about 8cm long. Increasing the length of the trace means that more voltage would be required to produce the same temperature increase.
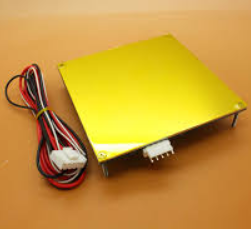
3.PCB Bed Heater
Choosing the best PCB bed heater is always difficult for most people. In most of the cases, some people may want to watch the video and do research on the internet on the best heaters available on the market. Unfortunately, this ends up confusing them further. So we need to answer the question which is the best PCB bed heater? To do this, we need to look at some of the things that you need to consider. First, heaters come in different sizes with varying power needs. Most PCBs are squared even though we have exceptions. Silicone heated pad is one of the options that you may have to consider. It comes with adhesive backing and an embedded thermostat The Silicone PCB bed heater with adhesive has a fixed build blade which ensures that there is no fixed plate. It heats more evenly and easy to use. It also comes with an inductive sensor for leveling compensation. It can be used normally without the risk of breaking. The device gives you a number of power selections which frees you from power supply limitations. It allows you to achieve a faster heat up time.
4.DIY PCB Heater
If you have a 3D printer or a seed germination nursery and you are worried about the dropping temperatures, you can learn how to make your own PCB heater at home. The heating element could be used for many other applications such as preventing your electronics from freezing, controlling humidity, or just preventing materials from sticking onto one another or any other thing that may require high temperatures.
Notice that most heaters are made of high resistance material which when some voltage is applied results in a current which in turn dissipate heat. Some of the commonly used materials are nichrome wire. Chromium has a high resistance compared to steel and copper and reacts with oxygen to form chromium oxide layer, which prevents the heating element from further deterioration. Its temperature coefficient is positive meaning that it is capable of heating up fast when some voltage is applied across it. It is self-regulating and will prevent any further heating. However, some applications may find nichrome heater element inappropriate because they produce intense heat which radiates from the element. From this discussion, it is obvious that heater elements can be relied on when designing circuits for heaters and cookers. However, when you are planning to make non-intensive heating elements, then you may be forced to rely on other options such as PCB traces.
Post Your Ad Here
Comments