How to Disable Startup Delays in Windows 10?
Startup Delayer offers users the power to optimize their Startup Process by delaying apps from starting up as soon as they sign into your device.
In case you wish to disable Startup Delay, and want the apps to launch immediately after the start-up procedure of Windows, you need to go through the procedure registry modifications in Windows Registry section.
Here is how to easily disable Windows 10 Startup Delay:
Disabling Windows 10 Startup Delay by Using Registry Editor
If you desire to deactivate the process of Windows 10 start-up delay, then you will require to make some modification into your Windows Registry section.
Windows Registry is a robust tool, and the user is always recommended not to misuse it, doing so results in the failure of apps or software. Editing the registry section is not a difficult task, but you need to stick to the guidelines carefully. In case you are new to editing the Windows Registry, then take the help of a software expert or read the Registry Editor Help section.
Follow these instructions to disable the Startup Delay in Windows 10:
- In the beginning, launch the Windows Registry Editor by tapping the Start button followed by entering “Regedit” into the search panel.
- Tap the Enter key to proceed with your command.
- Now, a new screen will pop-out on your device asking for your permission to access the data.
- Allow the same to continue.
- After that, locate the under-mentioned path by using the left-hand sidebar:
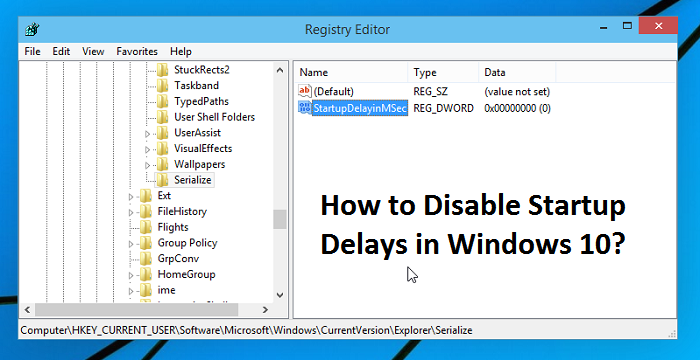
“HKEY/LOCAL/MACHINE_SOFTWARE_Microsoft/Windows/Current_Version_Explorer_Serialize//”
- Now, you have to copy and paste the above-provided path into the address section of your Registry Editor page.
- In case you see that the keyword “serialize” doesn’t exist there, you have to create it. Then perform a right-click on the parent key (Explorer).
- Now, select the New tab and press the Key option.
- Next, you have to provide the name “Serialize.”
- After that, apply right click on the Serialize key and then select the option New.
- Then, move towards the “DWORD (32-bit)” Value option.
- Now, you have to name this New Value as “StartupDelayInMSec.”
- After that, you need to modify that particular value. To do so, apply double tap on the section “StartupDelayInMSecvalue” and then ensure that the particular value is set to “0” into the section of “Value data.”
- Tap the OK button and then get out from the Registry Editor page. To make the device accept your modifications, reboot the PC. Now check that the “start-up delay” is still appearing or not.
- Note: Once you have deactivated the “Startup Delay” on your device, it is recommended to run the device with care as a system might face some issues. So it is recommended to activate the feature to let Windows load apps and programs normally.
- If any point in future, you wish to re-enable the “Startup delay” process of your device, then follow these instructions:
- Launch the Registry Editor page and then remove the value entry “StartupDelayInMSec” and then tap the Delete button to continue.
After starting-up the device, Windows takes about ten seconds before launching all the programs. This process is known as “Startup Delay.”In case you wish to disable the same, then follow the process mentioned above.
I’m Emma Justin . I’m a web developer living in USA. I am a fan of technology, entrepreneurship, and web development. I’m also interested in education and writing. Also You can read our Blog, pctechwire.com
Source: How to Disable Startup Delays in Windows 10?


Post Your Ad Here
Comments