Filters and Filter Pages in Microsoft Dynamics NAV
Filters have been a very widely debated and discussed topic in Microsoft Dynamics NAV with their usage being acknowledged by technology experts everywhere. Meant for various tasks such as displaying certain accounts, customers, entries and other records by specifying criteria for fields in a table and much more, the same have to be known to be used smartly on the widely popular enterprise resource planning solution.
You use filters to display certain accounts, customers, entries, or other records by specifying criteria for fields in a table. Only records that match the criteria are displayed. If you specify criteria for multiple fields, then records must match all criteria to be displayed.
How to Create Filter Pages for Filtering Tables in the Best ERP Software for Small and Mid-Segment Businesses?
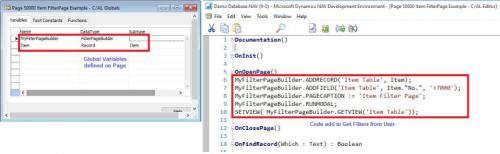
End Users begin doing this by first going to the C/AL Code and using the filter FILTERPAGEBUILDER Data Type to Create a Filter Page that enables users to set filters on multiple tables. Filter Pages contain either one or multiple filter controls and each filter control can be used to set filters on a specific table. In the NAV Client, filter pages are generated at runtime and run in a modal dialog box. In order to Create a Filter Page, you use C/AL Code and the various functions available for the FILTERPAGEBUILDER Data Type.
For those curious to know Whats New in NAV 2016 as far as the FILTERPAGEBUILDER Data Type Functions are concerned, then given below is a table that described all the C/AL functions of the FILTERPAGEBUILDER Data Type:
1. ADDTABLE Function: This helps add a filter control for a table to a filter page.
2. ADDRECORD Function: This helps add a filter control for a table to a filter page as specified by a record data type variable.
3. ADDRECORDREF Function: This helps add filter control for a table to a filter page as specified by a recordref variable.
4. ADDFIELD Function: This helps add a table field to the filter control for a table on filter page.
5. ADDFIELDNO Function: This helps add a table field to the filter control for a table as specified by the field number.
6. GETVIEW Function (FilterPageBuilder): This helps get a filter view for the record in the specified filter control of a filter page.
7. SETVIEW Function: This helps set the current filter view, which defines the sort order, key and filters for a record in a filter control on a filter page.
8. RUNMODAL Function (FilterPageBuilder): Builds and runs the filter page.
9. COUNT Function (FilterPageBuilder): This helps get the number of filter controls specified in FilterPageBuilder object instance.
10. NAME Function (FilterPageBuilder): This helps get the name of a table filter control included on a filter page based on an index number assigned to the filter control.
After having a Microsoft Dynamics Implementation of NAV 2016 done or getting the latest Microsoft Dynamics NAV Upgrade in place, organizations will be able to Filter Data on a NAV Page.
1. On Web Part Pages, end users can use the Web Part connections to filter on a single data field.
2. On pages displayed by using a URL, end users will be able to add a filter query string to the URL.
3. They will be able to add filters from the C/AL Code by using the SETFILTER and SETRANGE functions on the fields.
4. On List Type Pages, end users will be able to Use the Quick Filter Field displayed on top of the page.
By combining all of these methods, end users will be able to setup multiple layers of filters for filtering on more than one data field. The NAV SharePoint Client has the following limitations on filtering in comparison to the NAV Windows Client:
1. Advanced Filtering on List Type Pages is unavailable.
2. Filter Action in the Action Strip on List Part type pages in page parts is not available.
To Set Filters, the following instructions should be considered:
1. An understanding of where and how filters persist should be there. Since filters are window dependent, it is important to know that is a filter is applied to one list and switched to a different one, then the filter stands unapplied. The filter persists on the list where it is set until cleared or specified with a new criteria.
2. One should only use filters that have meaning and make sense. To cite an example, an interval can be specified that does not exist and cannot be verified. In order to enter meaningful filters, it is important to have a knowledge of the sorting rules applicable.
3. Filters have to be checked occasionally through the filter pane. Go to Application menu, choose Customize. Choose Filter Pane. See an Overview of All Filters. To remove all filters, choose page title drop-down arrow. Now choose Clear Filter. This cancels a default list view such as that set for Sales Orders – Open.
To Filter Lines to the Value of the Selected Field, follow the instructions mentioned below:
1. Check for a page that lists lines. On this, place the pointer in the field with a value on which you want all the lines filtered.
2. Going forward, a simple right-click on the field and choosing Filter to this Value should do.
3. This immediately filters the Visible Lines to the ones containing field values. Values targeted with Filters can be seen in the Type to Filter box.
4. In case you wish to remove the applied field filter, you Press F3 to move your pointer to the Type to Filter field and select/delete the filter values. Press Enter to remove the filter.
In Order to Set a Field Filter, the following instructions ought to be followed:
1. Go to the Search box -> Enter Customers -> Choose related link
2. Go to Type to Filter -> enter GREEN
3. Press Tab key -> Go to Choose a Column drop-down list box -> select Location Code -> Choose field to select the field for the filtering value -> Press Enter. Remove the filter whenever you wish to see hidden records, as only ones which GREEN as Location Code are displayed
5. You can remove the filter by deleting the value in the Type to filter field. Now all the cards in the Customer List are visible. If you wish to set multiple field filters, then you must use the Advanced Filter Function.
In Order to Set Multiple Field Filters, you have to use the Advanced Filter Function on the Filter Pane.
1. In the Search Box, enter Chart of Accounts. Choose related link
2. Select Page Title Menu, Choose Advanced Filter. A new filter pane opens displaying all advanced search criteria
3. On the first line for the Where Filter in the Number Column, Choose the Field, Choose Account Type
4. Enter a Value Field, Choose Drop-Down Arrow
5. Select Total Check Box. Only lines with Account Type are displayed. Filter the Data more by specifying more criteria
6. Choose Add Filter to Start a New Line
7. In the And Field, select Balance
8. Go to Enter a Value field, enter > 10000. Lines with balances > 10000 get displayed. Continue adding new filters or modifying existing ones
9. To Clear a Filter, choose Delete X to Clear the unwanted Filter Line
10. To Clear all Filters, select Chart of Accounts page title menu and Choose Clear Filter
Next comes setting a Filter in a Calculated Field. The FlowFilter is MS Dynamics NAV is meant for this purpose as it filters the contents of the fields displaying amounts or quantities calculated from entries in other tables. This can be used for seeing entries in other tables, especially the ones with a certain date interval or with a certain location code. FlowFilters are to be entered in those fields ending with the term ‘Filter’, ones such as Date Filter, Global Dimension 1 Filter and Location Filter.
In order to set a Flow Filter on a Card, the following instructions have to be followed:
1. Go to Search -> enter Items -> choose related link
2. Select Page Title Menu -> choose Limit Totals
3. A Limit Totals to Section is displayed on the Filter Pane
4. Go to Where -> Go to the Number column -> choose field -> choose Location Filter
5. Choose the Enter a Value field
6. Select GREEN location -> The location you select gets displayed in the Limit Totals to Section
7. Select an Item in the List -> Go to Home -> Manage -> choose Edit -> This opens the Item Card. The General FastTab can be used to view all the availability quantities for the GREEN location
8. To remove filter, go to Actions -> Page -> choose Clear Filter
In order to set a Flow Filter on a List Page, the following instructions have to be followed:
1. Go to Search -> enter Chart of Accounts -> choose related link
2. Select Page title Menu, choose Limit Totals. A Limit Totals to Section gets displayed on the Filter Pane
3. On the First Line -> Go to Where Field -> Go to Number Column -> choose Department Filter
4. Choose Enter a Value field
5. Select Sales -> Whatever department has been selected gets displayed in the Limit Totals to Filter
The moment you are done viewing your data with Flow Filters, all you need to do is choose Delete X on the line to clear the Filter.
You use filters to display certain accounts, customers, entries, or other records by specifying criteria for fields in a table. Only records that match the criteria are displayed. If you specify criteria for multiple fields, then records must match all criteria to be displayed.
How to Create Filter Pages for Filtering Tables in the Best ERP Software for Small and Mid-Segment Businesses?
End Users begin doing this by first going to the C/AL Code and using the filter FILTERPAGEBUILDER Data Type to Create a Filter Page that enables users to set filters on multiple tables. Filter Pages contain either one or multiple filter controls and each filter control can be used to set filters on a specific table. In the NAV Client, filter pages are generated at runtime and run in a modal dialog box. In order to Create a Filter Page, you use C/AL Code and the various functions available for the FILTERPAGEBUILDER Data Type.
For those curious to know Whats New in NAV 2016 as far as the FILTERPAGEBUILDER Data Type Functions are concerned, then given below is a table that described all the C/AL functions of the FILTERPAGEBUILDER Data Type:
1. ADDTABLE Function: This helps add a filter control for a table to a filter page.
2. ADDRECORD Function: This helps add a filter control for a table to a filter page as specified by a record data type variable.
3. ADDRECORDREF Function: This helps add filter control for a table to a filter page as specified by a recordref variable.
4. ADDFIELD Function: This helps add a table field to the filter control for a table on filter page.
5. ADDFIELDNO Function: This helps add a table field to the filter control for a table as specified by the field number.
6. GETVIEW Function (FilterPageBuilder): This helps get a filter view for the record in the specified filter control of a filter page.
7. SETVIEW Function: This helps set the current filter view, which defines the sort order, key and filters for a record in a filter control on a filter page.
8. RUNMODAL Function (FilterPageBuilder): Builds and runs the filter page.
9. COUNT Function (FilterPageBuilder): This helps get the number of filter controls specified in FilterPageBuilder object instance.
10. NAME Function (FilterPageBuilder): This helps get the name of a table filter control included on a filter page based on an index number assigned to the filter control.
After having a Microsoft Dynamics Implementation of NAV 2016 done or getting the latest Microsoft Dynamics NAV Upgrade in place, organizations will be able to Filter Data on a NAV Page.
1. On Web Part Pages, end users can use the Web Part connections to filter on a single data field.
2. On pages displayed by using a URL, end users will be able to add a filter query string to the URL.
3. They will be able to add filters from the C/AL Code by using the SETFILTER and SETRANGE functions on the fields.
4. On List Type Pages, end users will be able to Use the Quick Filter Field displayed on top of the page.
By combining all of these methods, end users will be able to setup multiple layers of filters for filtering on more than one data field. The NAV SharePoint Client has the following limitations on filtering in comparison to the NAV Windows Client:
1. Advanced Filtering on List Type Pages is unavailable.
2. Filter Action in the Action Strip on List Part type pages in page parts is not available.
To Set Filters, the following instructions should be considered:
1. An understanding of where and how filters persist should be there. Since filters are window dependent, it is important to know that is a filter is applied to one list and switched to a different one, then the filter stands unapplied. The filter persists on the list where it is set until cleared or specified with a new criteria.
2. One should only use filters that have meaning and make sense. To cite an example, an interval can be specified that does not exist and cannot be verified. In order to enter meaningful filters, it is important to have a knowledge of the sorting rules applicable.
3. Filters have to be checked occasionally through the filter pane. Go to Application menu, choose Customize. Choose Filter Pane. See an Overview of All Filters. To remove all filters, choose page title drop-down arrow. Now choose Clear Filter. This cancels a default list view such as that set for Sales Orders – Open.
To Filter Lines to the Value of the Selected Field, follow the instructions mentioned below:
1. Check for a page that lists lines. On this, place the pointer in the field with a value on which you want all the lines filtered.
2. Going forward, a simple right-click on the field and choosing Filter to this Value should do.
3. This immediately filters the Visible Lines to the ones containing field values. Values targeted with Filters can be seen in the Type to Filter box.
4. In case you wish to remove the applied field filter, you Press F3 to move your pointer to the Type to Filter field and select/delete the filter values. Press Enter to remove the filter.
In Order to Set a Field Filter, the following instructions ought to be followed:
1. Go to the Search box -> Enter Customers -> Choose related link
2. Go to Type to Filter -> enter GREEN
3. Press Tab key -> Go to Choose a Column drop-down list box -> select Location Code -> Choose field to select the field for the filtering value -> Press Enter. Remove the filter whenever you wish to see hidden records, as only ones which GREEN as Location Code are displayed
5. You can remove the filter by deleting the value in the Type to filter field. Now all the cards in the Customer List are visible. If you wish to set multiple field filters, then you must use the Advanced Filter Function.
In Order to Set Multiple Field Filters, you have to use the Advanced Filter Function on the Filter Pane.
1. In the Search Box, enter Chart of Accounts. Choose related link
2. Select Page Title Menu, Choose Advanced Filter. A new filter pane opens displaying all advanced search criteria
3. On the first line for the Where Filter in the Number Column, Choose the Field, Choose Account Type
4. Enter a Value Field, Choose Drop-Down Arrow
5. Select Total Check Box. Only lines with Account Type are displayed. Filter the Data more by specifying more criteria
6. Choose Add Filter to Start a New Line
7. In the And Field, select Balance
8. Go to Enter a Value field, enter > 10000. Lines with balances > 10000 get displayed. Continue adding new filters or modifying existing ones
9. To Clear a Filter, choose Delete X to Clear the unwanted Filter Line
10. To Clear all Filters, select Chart of Accounts page title menu and Choose Clear Filter
Next comes setting a Filter in a Calculated Field. The FlowFilter is MS Dynamics NAV is meant for this purpose as it filters the contents of the fields displaying amounts or quantities calculated from entries in other tables. This can be used for seeing entries in other tables, especially the ones with a certain date interval or with a certain location code. FlowFilters are to be entered in those fields ending with the term ‘Filter’, ones such as Date Filter, Global Dimension 1 Filter and Location Filter.
In order to set a Flow Filter on a Card, the following instructions have to be followed:
1. Go to Search -> enter Items -> choose related link
2. Select Page Title Menu -> choose Limit Totals
3. A Limit Totals to Section is displayed on the Filter Pane
4. Go to Where -> Go to the Number column -> choose field -> choose Location Filter
5. Choose the Enter a Value field
6. Select GREEN location -> The location you select gets displayed in the Limit Totals to Section
7. Select an Item in the List -> Go to Home -> Manage -> choose Edit -> This opens the Item Card. The General FastTab can be used to view all the availability quantities for the GREEN location
8. To remove filter, go to Actions -> Page -> choose Clear Filter
In order to set a Flow Filter on a List Page, the following instructions have to be followed:
1. Go to Search -> enter Chart of Accounts -> choose related link
2. Select Page title Menu, choose Limit Totals. A Limit Totals to Section gets displayed on the Filter Pane
3. On the First Line -> Go to Where Field -> Go to Number Column -> choose Department Filter
4. Choose Enter a Value field
5. Select Sales -> Whatever department has been selected gets displayed in the Limit Totals to Filter
The moment you are done viewing your data with Flow Filters, all you need to do is choose Delete X on the line to clear the Filter.
Advertise on APSense
This advertising space is available.
Post Your Ad Here
Post Your Ad Here
Comments