 Articles
How to Tear Down the iPhone X Logic Board and Upgrade the Memory
by Arvin Apsen Cell phone repair partsThe iPhone memory could be upgraded to larger storage by tearing the logic board, separating the NAND flash, and restore the data. We tried this before on the iPhone 6s and made the storage upgraded successfully. This time we do it on an iPhone X and see if it works. The iPhone X storage will be upgraded from 64G to 256G if the procedure is successful. Here are the steps we are taking in the process below. Check it out:
1. Tear down the phone and take out the logic board
Firstly, we need to tear down the iPhone display screen. Loosen the screws and remove the metal plate, then disconnect the battery cable and all the display screen connectors. Take out the SIM card tray. Carefully pry out the logic board from the phone, and fixing it on the PCB board holder. The NAND flash chipset is in the center of the logic board, which contains the memory data of the phone. We need to separate it so that we can restore the 256G data in it. Let’s move to the next step.
2. Separate the NAND flash chipset, copy and restore the data
Use hot air gun to blow on the NAND flash chipset in 330℃ until it is loose. Gently pry to separate it with an ultra-thin steel pry tool. Flip it over aside after it is separate from the board pad. Clean out the adhesive glue from the logic pad with tweezers with 365℃ hot air gun blowing at the same time. Place a new 256G flash into the NAND flash recovery data programmer and store the storage data. Take it out after it is finished and place the 56G NAND flash into the programmer. Restore the data to the flash from the programmer. Now the NAND flash storage data has been rewritten. We need to reball it and install it back to the logic board.
3. Reballing the NAND flash and install it to the logic board
Place the NAND flash on the repair table. Cover the GBA reballing stencil on it, make sure it is in the right position on it. Smear the solder on the stencil and heat the solder with 330℃ hot air gun blowing until it shapes completely. Remove the stencil after the solder coagulated. Hot air gun blow on it for a while to make it shapes completely. Leave the NAND flash to cold down and then install it back to the logic board. Before that, we need to paste some BGA fluid on the logic board pad. Hot air gun blows on it and adjust the position with tweezers.
4. Install the logic board back to the iPhone and connect the display screen back
After the NAND flash is cold and coagulated, we need to install the logic board back to the iPhone. Tighten the screws for fixing the logic board. Connect the display screen back and insert the SIM card tray back. Plug the battery connector and fixing the cables with metal plate and screws. Turn on the iPhone and connect it to computer via iTunes.
5. Store the iPhone in DFU mode and assemble the iPhone
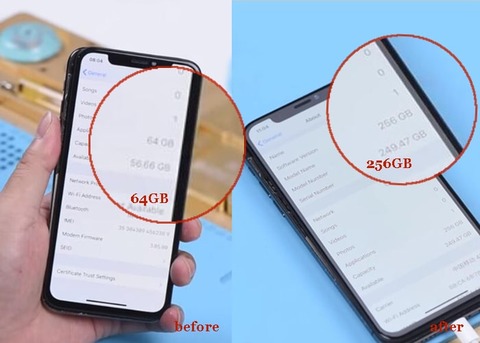
In the end, we need to store the iPhone in DFU mode so that the storage data could be restored. When the process is finished, the iPhone will restart automatically. At this time we can check the storage on Settings. Here we can see the memory has been upgraded into 256G. Turn off the phone and assemble the iPhone X display screen and digitizer back. All the procedure is finished.
Finally, we need to know that the manipulation above is under the hands of the professional repair person’s, and with the technological devices. The iPhone logic board life will be shortened after the storage upgrade procedure. We suggest you consider it times if you want to do it to your iPhone X. Anyway, Etrade Supply has the best iPhone X replacement parts here. Please go to our online store or contact us if you need any parts for iPhone repair.
Sponsor Ads
Created on Jul 25th 2020 01:28. Viewed 314 times.

Comments
No comment, be the first to comment.
