 Articles
HOW TO CONNECT A NINTENDO WII CONSOLE TO A BROADBAND CONNECTION
by Alexa Thomson I am an accountancy expert who has worked withWant to get internet access on your Wii game console? Nintendo Wii allows the users to connect it to an internet connection. The process for connecting the Nintendo Wii console is a little lengthy, but simple too. Users have to access the Internet section in their Wii’s System Settings to choose and connect to a network. The simplest way for getting internet access is connecting your Nintendo Wii to a broadband connection. Once you succeed in doing so, you can download the free channels from Wii Shop Channel, browse the web, visit online sites, chat online, as well as update your Wii console. Here is how to connect your Nintendo Wii to a router.
Configuring and connecting a Nintendo Wii console to a broadband connection
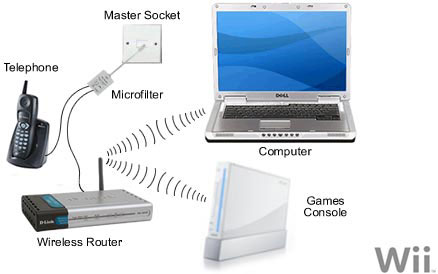
First, make sure that the internet connection (Broadband) is functioning correctly and running smoothly. In case you’re going to use the Nintendo Wi-Fi connector, then you have to install the software, and your computer should have internet access. After ensuring everything, follow the below-given guide to access the internet on your Nintendo Wii.
1. Start your Nintendo Wii.
2. Now, open the Wii options by selecting the round ‘Wii’ button at the lower-left corner of the home screen.
3. Move to ‘Wii Settings’ and select it. This opens the Wii System Settings 1 page on display with several options and a blue forward button at the center-right side of the screen.
4. For accessing the Wii internet settings, you need to go to the Wii System Settings 2 page. Use the forward button to go there.
5. Now, go down in the System Settings menu and select ‘Internet.’
6. Then select the ‘Connection Settings’ from the next menu.
7. Look for an open connection displaying the ‘none’ word and select it.
8. After that, choose a wireless connection.
9. Set up Access Point by manual configuration. You can use ‘Search for an Access point’ to set it up automatically.
10. Your Wii console will now search for the available wireless networks and display them on the screen. It shows both locked and unlocked network. In order to appear your wireless connection in this list, Broadcasting must be enabled on it.
11. Now, look for the internet connection you want to connect your Wii with. The network connections that have a closed padlock are locked, and hence require authentication for connecting.
Note: You will also see the signal of the connection. If the signal appears red or yellow, this means the strength or stability of the connection is not as desired for the internet requirement of Wii. In such situations, try removing or minimizing the barrier between your Nintendo Wii console and the router. You can also avoid interference by switching the channel on the router.
12. Select an internet connection to connect and select ‘Save.’
13. Then, select ‘OK’ to save connection settings.
14. On the next screen, again you’ll be asked to choose ‘OK’ to begin the connection test. Click on ‘OK.’
15. Your Nintendo Wii now begins testing the connected network.
You have to be patient during connection tests, once your Nintendo console gets connected to the internet. You may be prompted to install an update, so allow the necessary update to download. Your Nintendo Wii console is now ready to access the internet. And, you can now do browsing, downloading, chatting and much more on the internet with your console.
Source By : canon printer support, lexmark printer support
Sponsor Ads

Created on Aug 28th 2019 01:15. Viewed 369 times.

