How to Set up Screen Time on Mac Running macOS Catalina
The Screen Time feature is finally introduced to Mac through macOS Catalina. The handy feature was previously available only on iOS devices like the iPhone and iPad. With the arrival of this tool, the users have been digitally empowered. It enables the users to get parental control of their screens. Users may fix the limit of usage for each application, block any app or have total access regarding the time slot & time management of various apps.
Switching on the Screen time on your Mac
Follow these steps to set-up and turn on the Screen Time feature:
- First of all, tap the “Screen Time” icon. It is located in the “System Preferences” panel.
- Then you have to choose the “Options” tab located at the left side panel.
- Hit the “Turn On” tab present at the upper-right edge of the screen. Here you may use Screen Time function on your Mac.
Switching off the Screen Time on your Mac
In order to stop the Screen Time feature on your device, you should follow the following instructions:
- First of all, go to the “System Preferences’ tab.
- Then hit the “Screen Time” icon.
- Now tap the “Options” tab located at the lower-left portion of the page.
- Go to the upper right part of your screen and then hit the “Turn Off” tab.
Sharing the Screen Time feature over macOS
With the Screen Time function of macOS, you can see all the time you have spent on the internet, applications, and programs. To know the exact time spent on your system, you have to turn the feature to “On”. To do this, follow these steps:
- Navigate to the “System Preferences” option and then hit the “Screen Time” option.
- Now you have to hit the “Options” tab located at the bottom of your screen.
- Then mark the option box named “Share Across Devices”.
Setting up Password to Screen Time on your Mac
Adding a password on your Mac is a reasonably simple process. By protecting your settings with a password, you enhance the security for your device and apps. Follow these steps to provide a passcode to the Screen Time feature:
- First of all, hit the “Screen Time” option located inside the “System Preferences” tab.
- Now tap on the “Options” button located at the lowermost portion of the screen.
- Then you have to mark the checkbox associated with the option that says “Use Screen Time Password”.
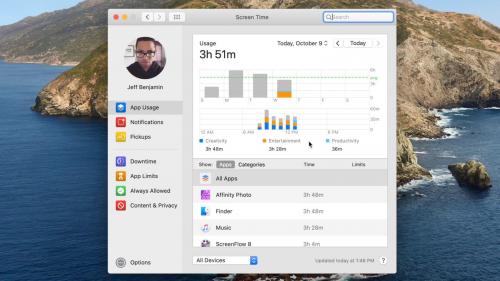
Checking the app usage on Mac
- First of all, hit the “Screen Time” option. It is located within the “System Preferences” tab.
- Then you have to choose the “App usage” option present on the left-hand side.
- Here you may view all your app usage according to the sections like day, apps and categories.
Checking notifications sent in the Screen Time on your Mac
- First of all, hit the “System Preferences” tab.
- Now choose the “Notifications” option located at the left-hand side of your window.
- Here, you can see all the notifications sent to you.
Checking pickups count in Screen Time on your Mac
- First of all, go to the “System Preferences” tab.
- Then hit the “Screen Time” option here.
- Choose the “Pickups” option located on the left-hand side of your screen.
Setting up the Downtime Schedule on Mac
- Go to the “System Preferences” tab.
- Then hit the “Screen Time” option here.
- Search for the “Downtime” option. Once you find it, click on it.
- Now you have to click on the “Turn On” tab in order to enable the Downtime option.
- Choose your desired schedule option: “Every Day” or “Custom”.
Adjusting limits through Screen Time for your Mac
- First of all, hit the “System Preferences” tab.
- Now you have to go to the “Screen Time” option and tap it.
- Choose the “App Limits” option present at the left-hand side of your screen.
- Hit the “Turn On” button to enable App Limits.
- Then hit the “+” signed tab to append the app category in the list.
- Now you have to mark the checkbox located next to the category limit option which you wish to limit.
- You may use either “Every day” or “Custom” option.
- Now follow steps 5 to 6 for each category repeatedly for the app which you wish to apply limitations.
- Hit the “Done” option to finish the process.
Withdrawing app limits
- Firstly, hit the “App Limits” option located on the left side of your screen.
- Then unmark the checked boxes.
- Next, hit the “Turn Off” tab in order to turn off the application tracking feature.
Setting up always allowed content on your Mac
- Go to the “System Preferences” tab and hit it.
- Now press the “Screen Time” option.
- Next, you have to choose the “Always Allowed” tab present at the left-hand side panel.
- Mark the checkbox dedicated to “always allow” option.
Applying privacy & restriction in Screen Time
- Hit the “System Preferences” tab.
- Then you have to select the “Screen Time” option.
- Now choose the “Content & Privacy” option located at the left-hand side of your page.
- Enable Content and Privacy option by turning it on.
- Now you will find four categories. You have to mark all the boxes. The sections are Stores, Content, Applications & others.
Emily Johnson is a Norton product expert and has been working in the technology industry since 2002. As a technical expert, she has written technical blogs, manuals, white papers, and reviews for many websites such as norton.com/setup.
Post Your Ad Here
Comments