How to Permanently Disable On-Access Scanner on McAfee?
Want to remove OnAccess Scanning on your McAfee antivirus? If yes, then you have landed on the right website. Here we are about to tell you how to get rid of from this function on your device completely. Disabling On-Access Scanner is considerably easy.
Why Would you want to turn off McAfee OnAccess Scanner?
When you try to install a new program on your PC, it sometimes prevents the program to be installed on your device, and it can even block the setup installation wizard. Access Scanning feature also blocks internet access for an installation process which will result in the failure installation again. However, this feature is meant to protect your device from malicious software or applications.
How to Disable McAfee On-Access Scanning?
Here’s how to turn off this feature temporary on your computer:
1. On the bottom-right of your screen, on the system tray, right-click on the “McAfee” (V-shaped shield) button. (This option is located near the PC’s clock).
2. Select the “Disable On-Access Scan” option from the given options.
That was it. Now you can install any program without any hassle at all.
How to Disable McAfee OnAccess Scanner Entirely?
Here’s how to disable it completely:
1. Hit the “Start” key on your keyboard to trigger the start menu.
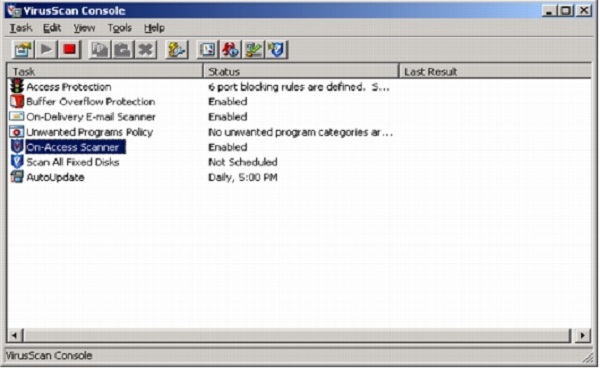
2. Head to the “Programs” option, and then go to the “McAfee Virus Scan Console” option.
3. Navigate to “Access Protection” and a new tab “Access Protection” will trigger just after that.
4. Now Uncheck “Prevent McAfee Services from Being Stopped.”
5. Hit Apply and then press the OK button. You can now close the Window.
6. Now hover your cursor on the McAfee icon located in the right corner of the taskbar and right-click on it.
7. Choose “Disable On-Access Scan” option.
Now your Scanner is disabled.
How to Uninstall the On-Access Scanner on McAfee?
If you never want to use OnAccess Scanning again, then you can also remove it permanently. Here’s how to do that:
1. Press the “Start” key on your Keyboard or click the Windows icon located on the left corner of the taskbar to open the Start Menu on your device.
2. Now navigate to Control Panel.
3. Go to the “Uninstall a program” option.
4. Navigate to “McAfee On-Access Scanner.” click on the uninstall button.
5. Follow the on-screen instructions to complete the un-installation process.
6. Restart your device to experience the changes.
John Smith is an avid technical blogger, a magazine contributor, a publisher of guides at mcafee.com/activate, and a professional cyber security analyst. Through her writing, she aims to educate people about the dangers and threats lurking in the digital world.
Post Your Ad Here
Comments