How to Defrag Windows 10 Computer (8 easy steps)
Here are the eight methods to Defrag Computer in Windows 10. Utilizing a hard disk makes an operating system slugging as the drive saves data in a logical order using spinning platters. In case a user deletes, then the hard disk replenishes the files automatically in the block get corrupt or split the data. So, make sure to check the listed steps to learn how to optimize conveniently.
1. Set Start Menu to Optimize Drive:
- On your system screen, tap on the Start button.
- Press the hash (#) icon available on the top.
- Choose the W alphabet and proceed.
- Look for Windows Administrative Tool and tap on it.
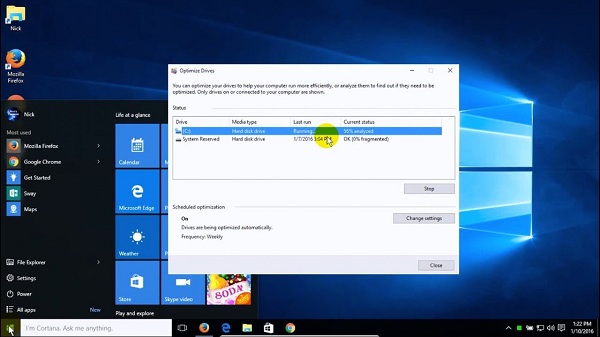
- After that, click on Defragment and Optimize Drives.
- Now, hit on the best match and pick the Analyze option.
- Wait for few seconds until the process completes.
- Once the system shows how much hard drive is fragmented.
- Tap on the Optimize button.
2. Do it with Windows Search:
- To begin with, tap on the search bar on the taskbar.
- Write the defragment into the required field.
- Next, tap on the Defragment and Optimize Drive from the search result.
- On the succeeding window, choose the preferred drive to defrag.
- At last, press on the Optimize option.
3. Use Run Command:
- Press and hold Win + R button together on your console.
- On the Run Dialog box, type dfrgui in the text box.
- Tap on the Ok button and launch the Defragment tool.
- Now, when the Optimize Drives shows up, choose any drive.
- Then click on the Optimize option.
4. Use Cortana Assistant to Defrag Computer:
- After setting up the Cortana assistant, tap on the Cortana icon on the taskbar.
- Choose the microphone sign.
- Next, say, “Hey Cortana, open Defragment and Optimize Drives.”
- When Cortana opens the named program, click on the preferred drive.
- Select the Optimize in the end.
5. Take the help of Control Panel:
- Click Win + R button to launch the Run Dialog box.
- On the following pane, fill the Control into the text area.
- Tap on the Enter button and proceed.
- On the Control Panel, set the View by to Category.
- Now, choose the System & Security.
- On the following page, click on Administrative Tools.
- Tap on Defragment and optimize your drives option.
- At last, press on Optimize and initiate the defrag process.
6. Use the Windows Settings Application:
- Hit the Win + I button the launch of the Windows Settings.
- Tap on Search bar option present on the top.
- Now, insert Defragment and hit the Enter button.
- On the search result, choose Defragment and Optimize your drive option.
- In the end, click on Optimize to start the process.
7. Through Task Manager:
- First and foremost, hit the Ctrl + Shift + Esc button on your console.
- On the task manager, tap on More Details.
- Select the File option from the Menu bar.
- Click on Run New Task.
- Enter dfrgui in the text area.
- Press the Ok button and proceed further.
- Later on, choose the drive and tap Optimize to start the defrag process.
8. With Command Prompt:
- Press the Win + R button simultaneously on your console.
- On the Run dialog box, enter CMD into the required text area.
- Write dfrgui in the black area.
- Tap on the Enter button on your keyboard.
- Click on Optimize after selecting the drive that you want to defrag.
Jack Arona is a creative person who has been writing blogs and articles about security. He writes about the latest updates regarding mcafee.com/activate and how it can improve the work experience of users. His articles have been published in many popular e-magazines, blogs and websites.
Advertise on APSense
This advertising space is available.
Post Your Ad Here
Post Your Ad Here
Comments