How to Adjust NVIDIA Driver Maximum Frame Rate?
In the starting of 2020, NVIDIA launched a new set of GeForce drivers along with most anticipated features. Now users can limit their computer’s framerates even for particular computer video games. In this article, you will learn why and how to adjust and increase the framerates in NVIDIA drivers. Let’s get started.
Why Limit Your FPS?
The function of limiting the FPS on NVIDIA graphics drivers allow the user to prevent the GPU from running excessively fast. The new features and updates are capable of the enhancing and decreasing framerates of the system GPU. By decreasing the FPS of your battery, you can save a lot of battery of your laptop as well as reduce the heat. This will allow you to play games for a prolonged period, especially while not connected to the charger.
How to Adjust FPS on NVIDIA Drivers for All Applications
This function can be accessed in the NVIDIA Control Panel. To maximize the GPU FPS on NVIDIA Graphics drivers, please see ht instructions mentioned down here:
- Make sure that you are on the Desktop screen or the home screen of your system.
- Then click in the desktop background and then choose the NVIDIA Control Panel.
- In case you do not see this option, it means the NVIDIA drivers are missing from your system, and you need to install them first.
- Once you are inside the NVIDIA Control Panel window, head to the Manage 3D Settings option situated under the 3D settings on the left navigation bar.
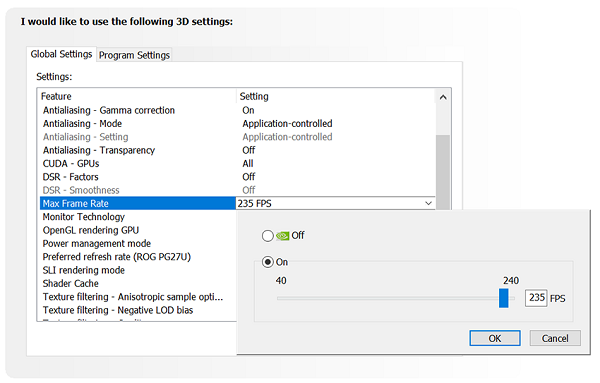
- To adjust the maximum frame rate for all programs on your system, make sure the Global Settings tab is opened.
- In the “Settings:” section, find the Max Frame Rate option and then press on the option located next to it.
- With default settings, the option is deactivated, and there is no cap set.
- To control the GPU frame rate, choose the On option.
- Now select the frame rate per second according to your requirement by dragging the slider left or right.
- Hit the Apply button from the lower of the window to make changes.
Adjust Max Frame Rate for Particular Application
The new drivers of NVIDIA Graphics also allow users to adjust the frame rate even for a specific program.
- Right-click the desktop background.
- Choose the NVIDIA Control Panel.
- Head to Manage 3D settings.
- In the Manage 3D Settings section, head to the Program Settings tab.
- Inside the Select a program to customize subheading, choose the program for which you wish to adjust the GPU FPS. If the program is not available in the list, then make a click on Add button to add the program.
- Now find the option saying Max Frame Rate and then press on it.
- Choose your preferred setting.
- With the default option, the app is selected as Use Global setting.
- Now to change the FPS settings for this particular app, change the Global settings option and set the frame rate for this app separately.
- Hit Apply to save the changes.
Launch the application to experience the changes in the performance of your graphics. You will surely save the power of your laptop as well as the heating issue would also be resolved.
In case you are not seeing this FPS adjusting settings in the NVIDIA Control Panel, then make sure to update the GPU drivers to the latest version and retry the above method.
John Smith is a qualified IT engineer by education. After working in the IT sector for a decade, He began writing about it two years ago. He loves to write about emerging technology like mcafee.com/activate.
Post Your Ad Here
Comments