Hair Masking – How to Do It In Photoshop!
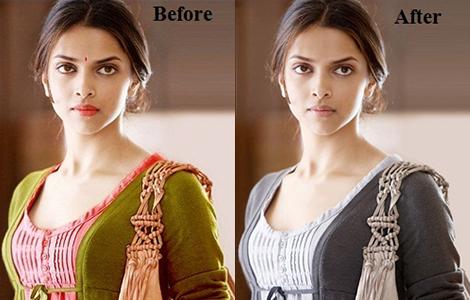
Cutting out people from images can be quite a task. In absence of the right software, it can be a very time-consuming task, especially if the subject has fine, curly or flyaway hair. Thankfully, in Photoshop CS5, CS5.5, CS6, CC or CC2014 the Refine Edge Tool can save a great deal of time and effort. The built-in Edge Detection Technology and Smart Radius do the hard work for you by finely unravelling the delicate edges precisely.
Most of the times you will prefer hiring a professional for hair masking services but if you are willing to do it on your own; you must follow the steps given below.
•First take out your image and make a rough selection of the person you wish to extract from the original image. This can be performed using the Quick Selection Tool. For this, activate the Add to Selection icon from the menu. Click and drag over the areas you want to include and hold down the Alt key to exclude the areas.
•Once selected, select Refine Edge from the top submenu. This feature will allow a more refined selection. The dialog box will show options like the View Mode, which can be set to nay view mode you wish. Overlay gives an idea about what has been selected. On White and On Black gives the cut out views that will be composited on light or dark backgrounds.
•Next, you need to focus on Edge Detection. Dragging the Radius slider towards the right in smaller increments will give a detail view of the finer details included. Or, you can tick the Smart Radius box to let Photoshop do the edge cutting for you.
•Using the Refine Radius brush carefully around the edges of the hair line to select any missing areas. Press Shift + E to find the Erase Refinements Brush.
•Adjust Edge Sliders gives the power to gradually soften the edge of the selection. This helps create a more natural look. Shift Edge removes any glowing edges from selections against white or light-coloured backgrounds.
•Now select the Output mode. Choosing Layer Mask is a safe mode giving room to go back and bring in more of the image later on if you have missed any.
•Make sure to check the Remember Setting Box to save you a lot of time if you need to perform hair masking under the same lighting, background and/or model.
Alternatively, you can get help from a professional photo editor and get your job done.
Advertise on APSense
This advertising space is available.
Post Your Ad Here
Post Your Ad Here
Comments