How to Edit Photos Step by Step: Image Editing for Beginners
Once you’ve taken your first photos and gained experience with your new camera and all its features, you may start to get interested in the editing process. The goal of photo editing is to bring out the best in your photos. However, it’s not necessary to make radical changes or over-the-top retouching of your images; just a few basic corrections can greatly improve the appearance of your photographs. In this article, we’ll tell you what retouching techniques you can apply to your photos and how to start mastering photo editing techniques.
Photo Editing for Beginners: Why Should I Edit My Photos?
Whether you’re a beginner or a photography professional, a photo rarely comes out perfect the first time you take it, as there are always small details you can correct to further refine the result. Especially for novice photographers, who are still learning how to take photos, it’s not always easy to have the camera set up with the optimal settings to get the photo just the way you want it. This is where image editing can help. In the blink of an eye, you can correct exposure, balance colors, and apply many more corrections until you achieve the photo you had imagined .
Photo editing has nothing to do with manipulation. Editing involves changing small things with the goal of improving the visual effect of the image . That’s why it’s worth getting into the world of editing at the same time you’re taking your first steps with a camera. This way, you’ll quickly develop an instinct for what you’ll want to retouch in each photo, which will make it easier to find your own style .
Finding the Perfect Photo: How to Edit an Image Step by Step
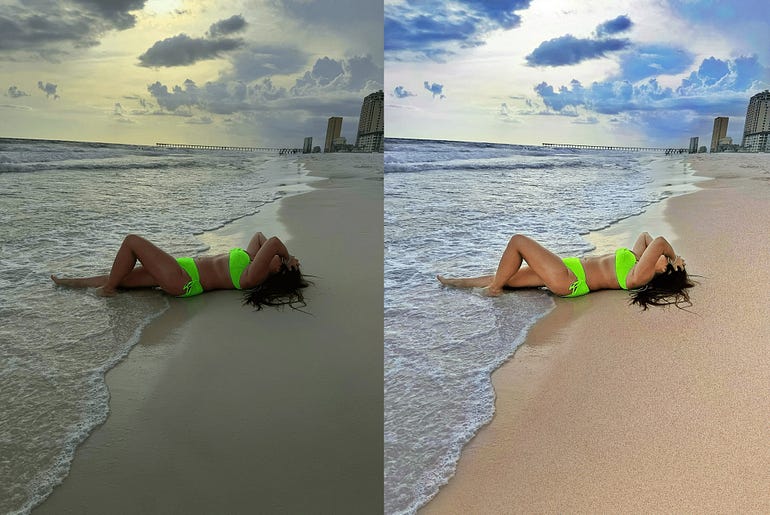
Even the smallest corrections can have a dramatic impact on a photograph. In the step-by-step tutorial below, we’ll show you what basic corrections you can apply to your photos to optimize them. Both the described functions and the tips have been deliberately kept very generic so you can apply them with any image editing program .
Tip: It’s best to shoot photos in RAW mode. With this option enabled, the camera saves all the information the sensor records during a shot, without any compression, making it easier to edit the image later. However, this option requires more storage space, as the resulting files are larger.
How to edit a photo, step 1: straighten the image
When taking handheld photos, they often end up crooked. This can be a problem, for example, when taking landscape photographs, where the horizon must be straight for a harmonious image.
To straighten a slightly crooked horizon , many image editing programs have a dedicated tool, usually indicated by an angle symbol . When using this tool, you can straighten your image using a series of guides. However, keep in mind that, depending on your preferred perspective, your image doesn’t have to be perfectly horizontal. Often, following your instinct is the best option in these cases.
How to edit a photo, step 2: remove annoying details
Sometimes details appear in an image (for example, spots or red eyes) that spoil the photo or even distract from the subject. Depending on the program you use, you can remove these elements using features like the Healing Brush, Object Eraser, or Red-Eye Remover , which automatically remove them.
How to edit a photo, step 3: adjust the exposure
As a general rule, and when in doubt, it’s better to slightly underexpose a photo than to overexpose it, as the latter causes the loss of image information that can be invaluable during the editing process. Underexposed photos, on the other hand, can be easily corrected to achieve the desired exposure. Several functions are available to do this :
Exposure : Changes the overall brightness of the photo. Use this feature if the entire image is too bright or too dark.
Brightness : Changes the brightness of the photo, especially affecting the central areas. This means that very bright and very dark areas of the image are modified to a lesser extent (see example image). This feature helps you brighten or darken a correctly exposed image.
Highlights/Whites : Adjusts only the bright areas of the image. With this feature, you can correct overexposed areas or generally brighten your photos.
Shadows/Blacks : Adjusts only the dark areas of the image. This feature allows you to highlight details in dark areas or brighten a photo that’s too dark.
In addition to exposure-related corrections, you can also reduce noise in your photos. Noise can appear in a photo if it was taken at a high ISO or using a long exposure time . To address this problem, image editing programs often offer noise reduction filters. Be careful, though, as these filters can also remove important details from the image.
How to edit a photo, step 4: change the contrast
Contrast is the relationship between the black and white tones in a photograph (see example image). Low contrast blurs contours, while high contrast emphasizes them and makes the image appear overdrawn. Therefore, it’s advisable to use this function sparingly to find a middle ground that serves to highlight what we want.
How to edit a photo, step 5: calibrate the white balance
White balance controls the color temperature of an image. In this case, the photographer’s taste and judgment determine the color temperature of a photograph. Typically, warm colors make the photograph appear more cozy and summery, while cool colors give the image more distance and a wintery feel (see example image).
How to edit a photo, step 6: apply color corrections
It’s important to perform this step after you’ve corrected the exposure and white balance, as these two adjustments can also cause changes in the image’s color. To make the colors in your image more vivid, you can use the following functions:
Color Correction
Saturation : Changes all colors in the image equally. High saturation adds more color to the image, while low saturation reduces the brightness of the colors, making the image closer to black and white (see example image).
Vibrance : Changes only the colors in the image that aren’t yet saturated. With this feature, you can adjust color intensity more subtly and specifically.
Adjusting color channels : In many image editing programs, you can edit colors separately. For example, you can make the red shirt in an image stand out from the rest or desaturate it slightly by using the red color channel.
Tip: Test all the settings to get a feel for your image editing program’s capabilities. Always compare the original image with the retouched version to better assess the changes. Sometimes it also helps to let the edited photo sit and approach it with a fresh perspective after a while.
How to edit a photo, step 7: change the photo frame
With the cropping tool, you can change the framing and proportions of your image. This way, you can find the right frame to highlight a specific subject or find the image composition you like best. Reframing is often useful when it serves to highlight a specific element in the image and clarify what you want to convey with your photograph.
How to edit a photo, step 8: sharpen the photo
Sometimes, photos taken in RAW format can appear slightly blurry. You can counteract this with the sharpening feature. Often, a small adjustment is enough to make your image look sharper.
In addition to these basic corrections, you can, of course, use many other options. For portraits , for example, you can add a vignette effect that darkens the edges of the image and thus draws attention to the subject. Preset filters can also make editing your photos easier. Just experiment with the different features, settings, and filters in your editing program to keep learning and improving.
Image editors for beginners: which one should I choose?
For your first steps in image editing, you’ll need to use the various free programs and apps available online. The basic corrections described in this article can also be easily performed using an editing program built into your device’s operating system. Once you’re familiar with the features, you can use free image editing programs, such as Gimp, which offers numerous options and makes the job easier for beginners.
If you’re an ambitious photographer looking to expand your range of possibilities or improve your skills, it’s worthwhile to upgrade to programs like Adobe Photoshop, Adobe Lightroom, or Luminar.
Conclusion: Use image editing to perfect your first photos
The degree of editing you apply to your images will depend on your goals and creative ideas, as there’s no right or wrong way to edit a photo. Editing tools give you the opportunity to optimize your photos and find your own style. It’s just a matter of experimenting and retouching the same photo in various ways until you find the creative path you feel most comfortable with.

Post Your Ad Here
Comments