 Articles
Tips and Tricks to Getting Started with Android SDK on Windows
by Pinal Goda React Native DeveloperYou may have heard that using Android SDK on Windows is not a straightforward process. In fact, it can be quite frustrating at times. However, this doesn’t mean you can’t use it on your Windows machine. Not at all. You just need to arm yourself with determination and patience to see this through.
Once you are done with the setup process and are ready to start developing apps for Android, it can be a little overwhelming. There are so many tools, libraries, and other elements that you might not know where to begin. Don’t worry!
This article aims to get you up and running with Android development on Windows as quickly and as painlessly as possible. Read on to find out everything there is to know about getting started with Android SDK on Windows.
What is Android SDK?
Android Software Development Kit or SDK for short is a collection of tools and libraries used for creating apps for Android. It provides all the necessary components for Android app development, including a Device Emulator, an IDE, builds tools, documentation, and sample code.
To put it simply, Android SDK is the one-stop shop for everything you need to create apps for Android.
While it is possible to create Android apps without using Android SDK, it is a tedious process that requires you to manually install Android system images and create emulators manually. Android SDK makes this process ridiculously easy and is the recommended way to create apps for Android.
Installing Android SDK on Windows - the Shortcomings
There are a few shortcomings that you will have to deal with while installing Android SDK on Windows. This can be a little frustrating at times, but the effort is totally worth it once you are done setting everything up.
Some of the setbacks that you might experience while installing Android SDK on Windows include -
Slow Initial Builds
Since the Android SDK Build Tools are a 32-bit application, they will take a little longer to build as compared to their 64-bit counterparts.
You can, however, fix this by making sure that you check the “Run this program in 32-bit mode” checkbox in the compatibility tab. You can also switch to the 64-bit versions of the Android SDK Build Tools manually.
Clearing Folder Resets
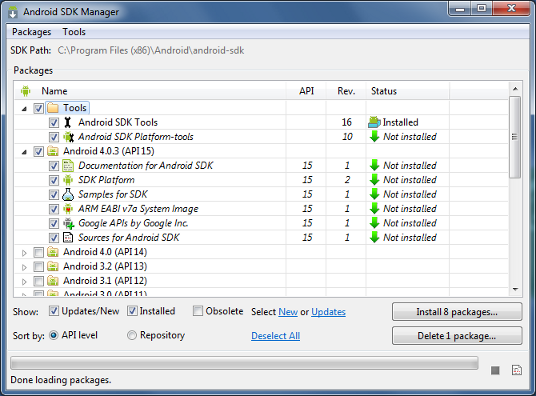
If you open your Android SDK Manager, the “SDK Tools” and “Android SDK Build Tools” folders will show as “Installed”. However, if you open “Extras”, they will show as “Installed” once again.
This is because these folders are reset whenever you open the SDK Manager. The only way to fix this issue is by setting “No” to the question “Would you like to reset this dialog” at the bottom of the Android SDK Manager window.
Get Your Android Apps Up and Running Using Windows
With the release of Windows 10, Microsoft has made it easier for users to get their Android apps up and running on their computers. The new feature allows you to install your favorite mobile applications on Windows 10 PCs using the virtual machine method. To get started with the Android development service, follow these steps:
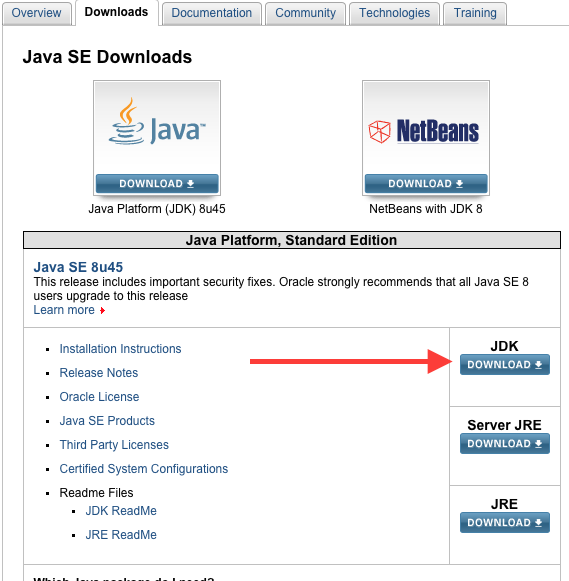
Step 1: Install Java Development Kit
Since Android SDK is built on top of Java, you will need to install Java Development Kit (JDK) before you can proceed with the installation of Android SDK. Make sure you download the correct version of JDK for your Windows machine.
Once you have downloaded the latest version of the JAVA installer file, double-click it and follow the installation instructions.
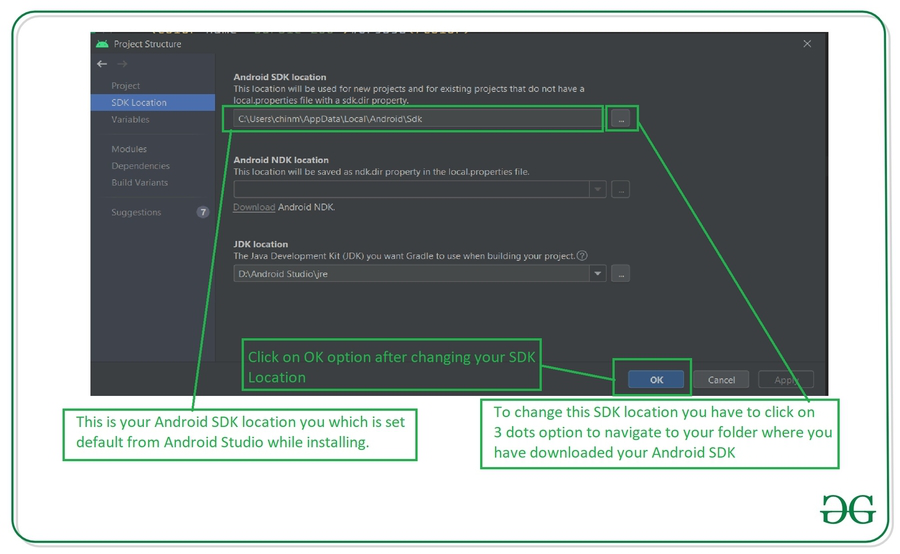
If you have installed a new version of JDK on your machine, you will have to add the JDK installation folder’s path to your Path Environment Variable.
To do this, open the Control Panel, navigate to “System and Security”, followed by “System”, and then click “Advanced System Settings” in the top-right corner.
In the “Advanced” tab that appears on the left, click “Environment Variables”. Select “Path” from the list on the right and click “Edit”.
Now, add the path to your JDK installation folder’s location.
Step 2: Configure your device
Android SDK comes with a device emulator that you can use for testing your apps on your Windows machine. However, you won’t be able to test your app on your real Android device until you set it up. You can use any device that runs Android OS.
To set it up, plug the device into your Windows machine using the USB cable, open the “Device” tab in Android SDK Manager, and click “Install”.
Now, select the Android OS version that your device is running and click “Install”.
The emulator will take a few minutes to install on your machine and you will be able to use your device as soon as the installation process is complete.
Step 3: Install ADB and fastboot tools
If you are developing apps for Android on Windows, you will need to install ADB and Fastboot tools. The necessary tools for installing ADB and Fastboot tools can be found in the “Extras” section of your Android SDK Manager.
Now, open a command prompt and type “ADB version”.
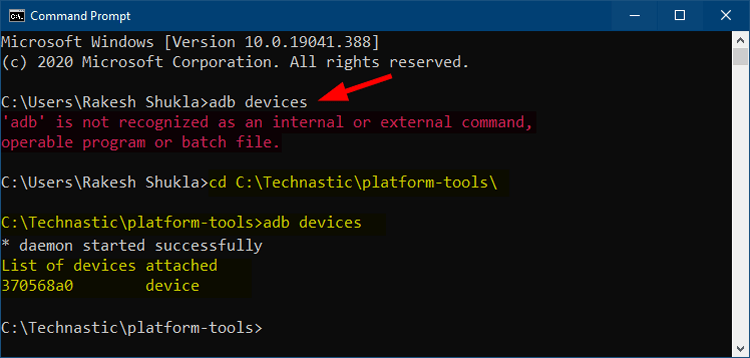
If you get a version number, ADB has been installed successfully. You can also try “ADB devices” to make sure that your device has been detected.
Similarly, if you have installed the ADB and Fastboot tools successfully, you can check if they have been installed on your machine by typing “fastboot devices” in the command prompt.
Step 4: Install Android SDK Tools and Build Tools
The Android SDK Tools are the core components of Android SDK. They provide you with the necessary tools for building Android apps. The Android SDK Tools can be found in the “Extras” section of the Android SDK Manager.
Similarly, the Android SDK Build Tools are the components that are responsible for building your apps. They include the C++ and NDK tools that are required for creating an APK file.
You can install the Android SDK Build Tools by clicking on “Install” in the Android SDK Manager and selecting the version that you would like to install.
Step 5: Fixing Path Errors and Clearing Folder Resets
Android SDK Manager automatically clears the “SDK Tools” and “Android SDK Build Tools” folders every time you open them. This is why you will notice that the folders will show as “Installed”, followed by “Cleared” every time you open the Manager.
You can fix this issue by following these steps.
Open the “Android SDK Manager”.
Click on “Tools” and select “Options”.
Click on the “Advanced” tab and uncheck the “Clear” button for both the “SDK Tools” and “Android SDK Build Tools” folders.
Close the “Options” window and open the “Android SDK Manager” again.
The “SDK Tools” and “Android SDK Build Tools” folders will now remain cleared across sessions.
Conclusion
Android SDK is the go-to tool for developing apps for Android. It is a great tool that comes with an excess of features, including an emulator, debugging tools, and more.
The only drawback is that it is not exactly a walk in the park to set it up on a Windows machine. This is not an issue, though, because if you follow the instructions outlined in this article, you won't face any problems while setting up Android SDK on Windows.
Sponsor Ads
Created on Nov 22nd 2022 05:10. Viewed 522 times.

