JCB Backhoe Loader Parking Brake Adjustment Guide
Here show you guide on how to adjust park brake for JCB backhoe loader.
If you need parts or service information for JCB brand backhoe loader,please check it here:2017 JCB Service Parts Pro + 2017 Service Repair Download
Procedures for JCB backhoe loader brake adjustment.
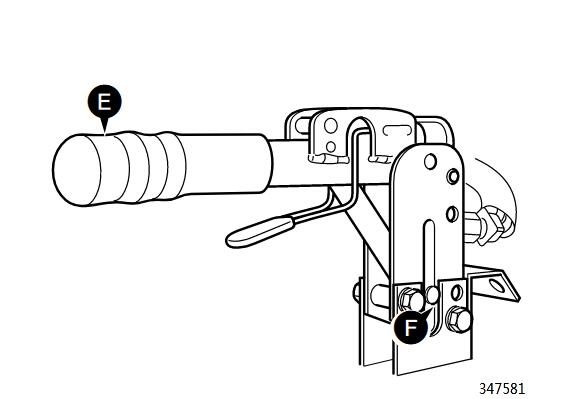
1.Disengage the parking brake (lever horizontal).
2.Turn handle grip E clockwise, half a turn.
3.Test the parking brake, see Section G, ServiceProcedures.
4.If the brake fails the test, repeat steps 1, 2 and 3. Ifthere is no more adjustment and pin Fis at the end ofits travel get the brake checked by your JCB Dealer

Checking the Foot Brake Fluid Level!
WARNING
Faulty brakes can kill. If you have to add oil to the brakereservoir regularly get the brake system checked by yourJCB Dealer. Do not use the machine until the fault hasbeen put right.2-3-2-51Park the machine on firm level ground, engage theparking brake and set the transmission to neutral. Raiseand block the loader arms. Lower the backhoe to theground and stop the engine.2Remove the reservoir capAand check the level. TheMAX and MIN marks are marked on the side of thereservoir B. If necessary, add fluid as in Step 3. If the level has fallen below the MIN mark, get thesystem checked by your JCB Dealer.
3.If required, carefully pour the recommended fluid (DONOT USE ORDINARY BRAKE FLUID) until it reachesthe correct level. 4Refit the reservoir cap. Wipe up any spillage.
https://www.autoepccatalog.com

The outer element must be renewed immediately if thewarning light on the instrument panel illuminates.2-3-3-1Note: Do not attempt to wash or clean the elements - theymust only be renewed.Note: Do not run the engine with the dust valve Jremoved.Note: A new inner element must be fitted at least every thirdtime the outer element is changed. As a reminder, mark theinner element with a felt tipped pen each time the outerelement is changed.
1.Stop the engine.
2.Remove the engine side panel (left hand side).
3.If changing the inner element, cover the end of the hoseto prevent rain and dirt from getting into the engine.
4.Depress clips Band lift off cover C. Remove outerelement D. Take care not to tap or knock the element. Ifthe inner element is to be changed, lift up pulls Eandremove inner element F. On turbocharged engines,remove pulsation ring L.
5.Clean inside the canister H, pulsation ring L, cover Cand dust valve J.
6.Insert the new elements into the canister, pushing themfirmly in so that seals Gand Kare fully seated. Onturbocharged engines, assemble the pulsation ring Linto the cover, making sure that tongue Mfits into slotN. Fit cover Cwith dust valve Jat the bottom. Push thecover firmly into position and make sure it is secured byclips B.
Note:Pulsation ring Lis not fitted in this application.
7.Refit the induction hose to stub pipe A.
Make sure thatthe wire is connected to the Air Filter Blockedswitch.
JCB Parts Plus+ and Repair Service Manual Free Download
If you need parts or service information for JCB brand backhoe loader,please check it here:2017 JCB Service Parts Pro + 2017 Service Repair Download
Procedures for JCB backhoe loader brake adjustment.
1.Disengage the parking brake (lever horizontal).
2.Turn handle grip E clockwise, half a turn.
3.Test the parking brake, see Section G, ServiceProcedures.
4.If the brake fails the test, repeat steps 1, 2 and 3. Ifthere is no more adjustment and pin Fis at the end ofits travel get the brake checked by your JCB Dealer
Checking the Foot Brake Fluid Level!
WARNING
Faulty brakes can kill. If you have to add oil to the brakereservoir regularly get the brake system checked by yourJCB Dealer. Do not use the machine until the fault hasbeen put right.2-3-2-51Park the machine on firm level ground, engage theparking brake and set the transmission to neutral. Raiseand block the loader arms. Lower the backhoe to theground and stop the engine.2Remove the reservoir capAand check the level. TheMAX and MIN marks are marked on the side of thereservoir B. If necessary, add fluid as in Step 3. If the level has fallen below the MIN mark, get thesystem checked by your JCB Dealer.
3.If required, carefully pour the recommended fluid (DONOT USE ORDINARY BRAKE FLUID) until it reachesthe correct level. 4Refit the reservoir cap. Wipe up any spillage.
https://www.autoepccatalog.com

The outer element must be renewed immediately if thewarning light on the instrument panel illuminates.2-3-3-1Note: Do not attempt to wash or clean the elements - theymust only be renewed.Note: Do not run the engine with the dust valve Jremoved.Note: A new inner element must be fitted at least every thirdtime the outer element is changed. As a reminder, mark theinner element with a felt tipped pen each time the outerelement is changed.
1.Stop the engine.
2.Remove the engine side panel (left hand side).
3.If changing the inner element, cover the end of the hoseto prevent rain and dirt from getting into the engine.
4.Depress clips Band lift off cover C. Remove outerelement D. Take care not to tap or knock the element. Ifthe inner element is to be changed, lift up pulls Eandremove inner element F. On turbocharged engines,remove pulsation ring L.
5.Clean inside the canister H, pulsation ring L, cover Cand dust valve J.
6.Insert the new elements into the canister, pushing themfirmly in so that seals Gand Kare fully seated. Onturbocharged engines, assemble the pulsation ring Linto the cover, making sure that tongue Mfits into slotN. Fit cover Cwith dust valve Jat the bottom. Push thecover firmly into position and make sure it is secured byclips B.
Note:Pulsation ring Lis not fitted in this application.
7.Refit the induction hose to stub pipe A.
Make sure thatthe wire is connected to the Air Filter Blockedswitch.
JCB Parts Plus+ and Repair Service Manual Free Download
Advertise on APSense
This advertising space is available.
Post Your Ad Here
Post Your Ad Here
Comments