How to Fix Err_Connection_Timed_Out Error in Google Chrome
Err Connection Timed Out is the most common error which is often seen in Google Chrome web browser. Chrome running on Windows, Mac, Android, iOS is no exception for this error. Internet speaks that connection timed out error is frequent while accessing YouTube, Facebook, Yahoo Mail, Dropbox, GitHub, Google PlayStore, Netflix, Tumblr etc.
Err_Connection_Timed_Out often happens with only one URL and sometimes with all websites. It is usually pre-fixed with heading like The site can't be reached, The Web page is not available, www.facebook.com took long to respond. Chrome will suggest you three quick ways to fix this error.
- Checking the connection
- Checking the proxy and the firewall
- Running Windows Network Diagnostics
The irony is that it provides only limited solutions (only three) and it is not a complete workaround.
What does Err_Connection_Timed_Out mean?
This error says there is a fatal communication failure between the web browser and server. It might be due to following things:
- Server not responding in time.
- Delayed or no response from the server.
- Failed to establish a connection to the server.
- No internet access.
- The server can't process your request.
- URL is not valid anymore.
Having known what is it and why it happens, it is pretty decent to dig deep into the various possible solutions.
Working techniques to fix Err Connection Timed Out error in Google Chrome
These techniques range from low, mid to advanced level of solving Err_Connection_Timed_Out. Follow these methods to fix the error
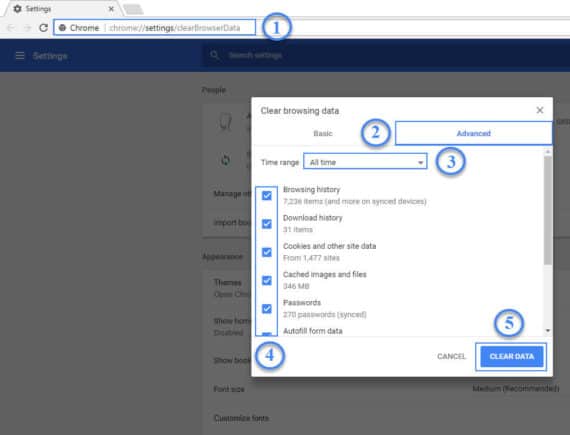
Method 1: Clear Google Chrome's browsing data from the beginning
Clearing Google Chrome's browsing data from the beginning will help you in resolving the cache and cookie-related issues. If the error message is the result of any of the browser data, then clearing the browsing data should resolve the issue. Here is the step by step procedure to clear Chrome's browsing data.
- Open Google Chrome and type chrome://settings/clearBrowserData in the address bar.
- Select Advanced tab
- Change the time range to "All time".
- Tick all the options
- Hit "Clear Data"
Here is the image displaying the step by step procedure to clear Google Chrome's browsing data.
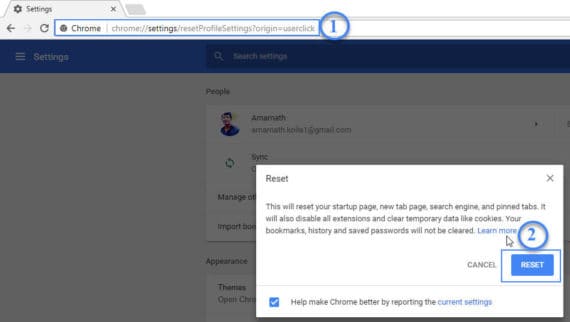
Method 2: Reset profile settings
Resetting profile settings is the second best way to resolve this issue. Logging with your Google account on multiple chrome instances is the reason for this issue. To resolve this conflict, resetting profile settings is the best way to do. Here is the step by step guide to reset profile settings in Goole Chrome.
- Open Chrome and type chrome://settings/resetProfileSettings?origin=userclick in the address bar.
- Click on RESET button to reset the Google Chrome settings
Here is the image displaying step by step procedure to reset Google Chrome settings
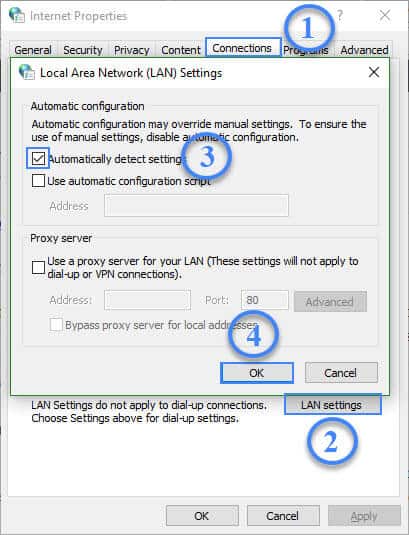
Method 3: Automatically Detect Settings in Internet Options
Automatically detecting settings in Internet options helps you in proper connection to your ISP. Using proxies might sometimes have the worst impact on accessing favorite sites. Let us show you how to enable automatically detect settings in Internet Options.
- Press Windows+R, type inetcpl.cpl and hit Enter.
- Navigate to Connections tab
- Click on LAN Settings
- Tick Automatically detect settings
- Click Ok
Here is the image displaying step by step procedure to automatically detect Internet settings.
Still having problem you can discuss with google support technician for best customer support
Post Your Ad Here
Comments