Free DIY Pool Cue Rack Plans You Can Make Today
A pool cue rack is a place where you store your cues. They come in various sizes, shapes, colors, and materials. Some racks are designed to fit over existing furniture, while others are built into walls.
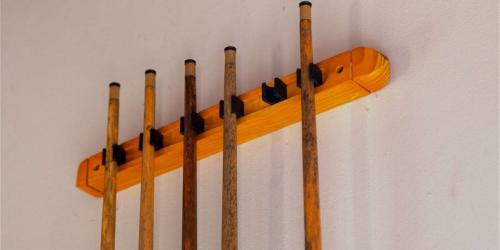
The cue rack for the pool is inexpensive and easy to build. It's easy to put up using ordinary drywall anchors made of plastic. If you pick a good wood to build the rack, it will be a beautiful piece of furniture to add to your billiards space.
I found the molding for the cap in my garage, but you might not be able to locate it at the large-box hardware store. Visit the local lumber yard or recycling store for building materials only 28 inches of material, and you're likely to find it in a surplus bin.
Tools
Jigsaw Drill with standard bits and 1 1/2 " (38 millimeters) Spade bit, table saw, or circular (optional)
Construction
1. Cut two 17 inches (43 millimeters) long pieces of 1x6 sheet for the bottom and top shelves. Utilizing a table or circular saw, reduce the shelves to 5 inches (12.7 centimeters) in width (this is not required, like a slightly larger rack). The frame can be able to hold six cues. You can choose to use whitewood or any other hardwood you like.
2. Set the compass to a 2 1/2 " radius, which is precisely half the board's width. Draw a half-circle at the sides of each shelf, and cut the curves using a Jigsaw.
3. Select which shelf is the upper shelf and the one that will be on the bottom. You'll look at both the base of the top shelves and the top of the lower shelf and mark the middle areas on the holes that are cues. Place the holes two and a half " (63 mm) apart and 1 1/2 " (38 millimeters) from the edge of the front. They are further to the left, leaving enough space between your brush, ball rack, and chalk cues.
4. Make use of a 1 1/2 " (38 millimeters) spade tool to make holes in on the upper shelf. Make use of the same tool on the lower shelf to create an opening around 1/4 " (5 millimeters) deep. You can't employ a hole-saw for this!
5. The depression should be just enough to fit the pads for furniture. Tape can be wrapped around the bottom of the piece to indicate the level.
6. Utilizing an Ogee bit to rout an attractive edge on both shelves. It would help if you routed the obvious edges: the bottom of the upper shelf and the top of the lower shelf. It would help if you did not scratch the edges of the back of the shelf.
7. Create a notch with your jigsaw at the top of the top shelf. It will go through make one hole. It is to be used for the bridge. The notch should be slightly larger than the narrowest portion of your stick so that the bridge won't slide out of the rack. It can be removed lower so the stick can fit into the gap.
8. Cut two 14" (35.6 millimeters) pieces of molding for the header cap and attach them to the shelf's bottom. Draw the positions for the wall mounting screws on the molding, then drill pilot holes at each location. Utilize the 3/8" drill bit to make an extremely shallow hole about 1/2 " deep within each hole. It will allow you to "hide" your screws in the molding. If you like, you could cover the holes with wood plugs once you have mounted the rack.
9. Complete the rack. I made use of Minwax Red Mahogany and semi-gloss polyurethane for this project.
10. Put 1 1/2 " round furniture pads into the recesses on the lower shelf to provide the cues to rest upon (check your kitchen's junk drawer -- it may already have these).
The Cue Rack is Mounted.
These shelves measure 47 inches (1.2 meters) apart. It is as far as they can go while holding the short cue. The lower shelf must hold about the same weight as a bookcase that weighs less; therefore, wall anchors hollow rated at 50lbs. (22.7 kg) are sufficient.
(If rugrats in your home are likely to be rougher on the rack, switch to more sturdy anchors). Make sure you utilize wood screws that are long enoughThey'll have to go through the cap of the header and be deep enough into the wall for a strong anchor. 2 inches (5 millimeters) screws are sufficient to be sufficient.

Comments