Easy Steps to Select Lexmark Printer Right Port
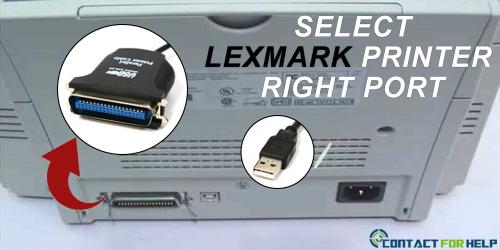
Lexmark printer is highly demanded for their efficiency, advanced features, upgraded technology and custom settings. For security reasons, the identification of the USB port is a necessity to manage the printing tasks without any error. Follow the below mentioned steps to locate the right port:
Sometimes due to the wrong network printer port the critical errors occur as,Not able to print, Unresponsive error, No communication, Print failure, and the selected port cannot be deleted. In such case, contact the Lexmark support professionals to receive immediate help regarding the printer port.
Due to port error, the printer pauses and displays the print queue icon in the systray task bar. If you drag the mouse cursor over the "Print Queue Icon" in the notification area, it will list pending documents. To resolve this issue, follow these steps:
- Print the network settings page
- Open Printers/Printer and Faxes folder
- Windows 7 users click Start/Device and Printers
- Windows Vista users click Start/Control Panel/Hardware and Sound/Printers
- Windows XP users click Start/Settings/Printer Faxes
- Right-click the printer object
- Choose properties from the drop-down list
- Click port tab
- Check the port tab and follow the final confirmation steps
Sometimes due to the wrong network printer port the critical errors occur as,Not able to print, Unresponsive error, No communication, Print failure, and the selected port cannot be deleted. In such case, contact the Lexmark support professionals to receive immediate help regarding the printer port.
Due to port error, the printer pauses and displays the print queue icon in the systray task bar. If you drag the mouse cursor over the "Print Queue Icon" in the notification area, it will list pending documents. To resolve this issue, follow these steps:
- Double click "Print Queue Icon" to open "Print Queue
- Click Printer icon appearing in the upper left-hand corner of the menu bar
- Click "Pause Printing" to turn-off the Window feature, if the check mark is clicked next to Pause Printing
- Check mark "Set As Default Printer" to ensure the " Use Printer Offline" is not selected
- Now print a test page
It is mandatory to choose the correct port, every Lexmark printer owner must focus to connect the machine perfect with the port. To avoid any inconvenience dial the Lexmark customer service number, the technical services are provided round the clock on all working days. For technical assistance take help of the tech industry professionals. Visit Contacforhelp to search alternative helpline number. The prestigious web-directory helps troubled clients connect with expert technicians.
3 people like it


Advertise on APSense
This advertising space is available.
Post Your Ad Here
Post Your Ad Here
Comments