Create a new QuickBooks Company file from an existing one
Creating a new Company file in QuickBooks from the scratch can be an arduous task for some users. However, QuickBooks users can follow an easy approach wherein they can Create a New QuickBooks Desktop Company File. The process has been simplified by our experts and a lucid enumeration of the same has been unraveled in this article. So, keep reading to know how to create a new Company file in QuickBooks from an existing one.
When should a
new Company file be created in QuickBooks from an existing one?
There can be several factors that embolden
the user to go for the creation of a new company file in QuickBooks to
replace the old one. These include:
·
Corrupted company file, which
may install a fear of permanent data loss in the user’s mind.
· Unsatisfactory and unacceptably slow performance of QuickBooks, especially when opening or modifying the company file.
·
Reaching the list Limits
·
Inventory tracking issues in
QuickBooks.
Procedure to Create
a New QuickBooks Company file in Enterprise Solutions, Enterprise Accountant,
or Premier Accountant
Users you are using QuickBooks Desktop
Enterprise, Enterprise Accountant, or Premier Accountant then you can use a
feature to quickly create new company files from existing ones. The below given
steps need to be followed to create the company file templates:
·
At first, you would have to
move to the File menu and select New company from existing company file.
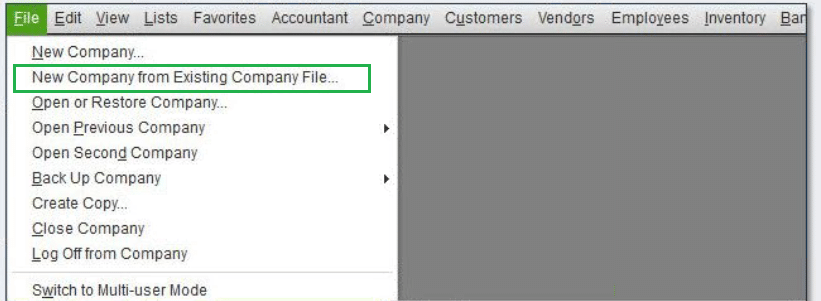
·
After
that you need to select the Browse tab and find the company file to be
copied.
- Choose the file and pick the Open
tab.
- Assign a name to the copy of
the company file.
- You should select the Create
Company option.
QuickBooks shall copy the preferences, memorized reports, chart of accounts, and other data to the new company file. [Note: Bank accounts and credit card accounts cannot be transferred. Also, information which is sensitive like the EIN number cannot be transferred due to security reasons].
Steps
to Create New QuickBooks Company File From an Existing One
Perform the following steps in order to
create a new company file from an existing one.
Step 1: Save a copy of account
balances
·
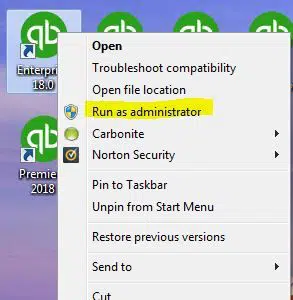
Run QuickBooks as you normally
do, but make sure to “Run as administrator”.
·
Now, access the “File”
tab to “open an existing company file” whose contents you wish to copy.
·
Henceforth, “press the F2 key”,
and wait till this action opens the “Product Information window”.
·
Observe the “File
Information section” and from this section, note the company file location.
·
If not taken the backup
already, take a backup of this file and save it to a suitable location on the
computer.
·
Now, restore the backup to the
original company file folder, and this action will create two files with the
same contents, but with different names.
Step 2: Erase transactions from copied company file
This step involves the removal of
transactions from the restored company file. The steps to achieve this are:
·
The backup of the company file restored
in the previous step has the same contents including the accounts, templates, lists,
and preferences.
·
You need to delete the
transactions of this restored file.
·
And after doing that, open the
company file to check if the transactions got successfully removed.
·
The next move is to head to the
“File menu”.
·
Without performing any other
operation, from the File menu, open “Utilities”.
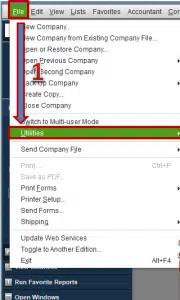
·
Here, choose the option to “Condense
Data”.
·
Also, “click on Yes” if the
message related the removal of budget data appears on the screen.
·
Then, “Select all
Transactions”. Now, click on “Next”.
Summing Up!
This article laid emphasis on the creation of a new QuickBooks company file from an existing one. If you face any obstacles, just give our QuickBooks desktop support team a call at 1-800-615-2347.
See Also: Fix QuickBooks Error 15103: While Updating Desktop or Payroll
Post Your Ad Here
Comments