Connect Your Laptop to a Wireless Router
There is no doubt that
the Internet and the computers have completely transformed our works and lives.
At present, almost all of us depend on the technology because it helps us to
make our work accurate and hassle free. There are so many essential peripheral
devices such as printers, routers, etc. all these types of devices enable to do
tasks with accurate results.
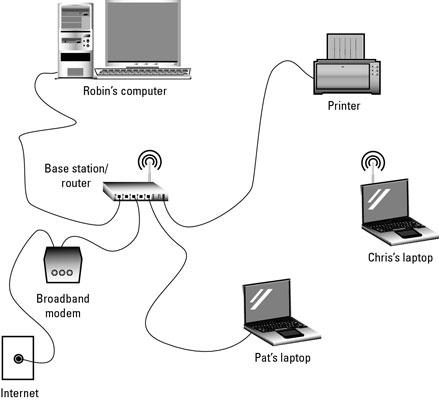
Router! This one is a
highlighted peripheral device, because it offers to connect multiple devices to
a single internet connection. So, you can make your own network area through
this device. Basically, the router is an essential device that broadcasts the
Internet signals to the multiple devices on the wireless network.
But, you have limited
mobility just because your laptop is tethered to the Internet connection by
cables defeats the whole purpose of a laptop. If users want to be able to
access the Internet, or share files / folders and printers with another system,
and still have the liberty to move around, then you will have to connect a
wireless router device.
Few steps are mentioned
here, which will guide you to connect a laptop to a wireless router using a
Windows 10.
·
First, purchase a router, which fits
your required and price range.
·
Now, follow the router’s instruction
manual to set up the router device and its Internet connection that will
possibly require connecting a cable to the router device. Once the wireless
router is set up, then the wired connection is no longer necessary.
·
Now, gather the information from the
setup process. To setup the wireless client, you need to know the Service Set Identifier,
the Wireless Encryption Protocol key, and the channel and mode.
·
After that, boot up your laptop device
and plug in the Wi-Fi card. If your laptop has an integrated Wi-Fi card, then
this will not be necessary.
·
After doing the above, install any
drivers needed to use the Wi-Fi card. Just, insert the disk, and follow the
on-screen installation procedure.
·
Double-click on the Wi-Fi Connection
icon in the system tray at the bottom of the screen.
·
Tap on ‘Properties’, then select the
‘Wireless Networks’ tab.
·
Now, use the ‘Add’ at the bottom of the
dialog if the Wi-Fi network is not in the ‘Available Networks’ section.
·
Simply, click on ‘Configure’ button when
you find your network’s SSID in the ‘Available Networks’. Now, type your
network’s SSID and WEP key.
·
After that, click on ‘Start’ and then
select ‘Connect To’ and ‘Wireless Network Connection’.
Now, your laptop should
be able to access the Wi-Fi network.
24/7
Tech Support for Router
Post Your Ad Here
Comments