 Articles
3 In 1 Tutorial
by Empayar Utama
Why 3 in 1? Because they are related with each other but you still can opt to choose or use one, both, or even all of them for your entry postings.
Actually I found these after changing template for my Malay Blog. I hoe this might be useful to the rest of bloggers especially newbie like me.
At first I tried what had been advised by Affan Ruslan but it seems like iwebtool is for advanced one, so I decided to use Google Gadget instead.
1. Change / Convert the html / script code to ease you display the original code/s at your entry post. These can be shared with the rest of readers.
2. Posting entry using scroll box.
This is good if your have a long entry post and you are displaying / publishing only one (1) post per entry. Great to have Quackit but I combined it with Belog Farah Shahirah to get the simplest one.
Still there are some disadvantages for business blogs; and entries with some CPM ads between postings because the purpose using scroll box is for minimizing entry post from being displays. And this is my scroll box codes – I use it at my Malay Blog:
<div style="border: 1px solid #c0c0c0; font: 12px; height: 750px; margin: 0px auto; overflow: auto; padding: 5px; width: 98%;">
THIS IS YOUR POSTING AREA, AND YOU MAY PUT PHOTOS, ADS, OR WHATEVER DESIRED ON YOUR POSTING
</div>
That’s the simplest one which has border, border color, font words, box height, auto margin, entry gap (padding), and width - I use percentage from the whole entry post width.
3. Auto setting the scroll box for next entries.
This is the shortcut on how to ensure that you have the same exact scroll box size for your entire / next entries.
1. Go to Dashboard ---> Settings ---> Formatting
2. Put the original scroll box (without converting through code converter) inside Post Template box and press Save Settings
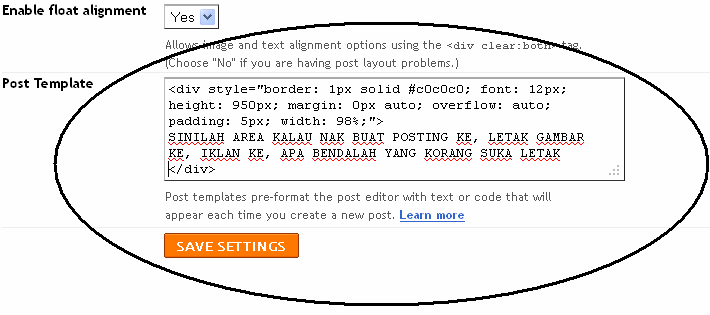
3. It’s done. You can start posting new entry from your pre-setting scroll box.
.
Sponsor Ads
Created on Dec 31st 1969 18:00. Viewed 0 times.

Comments
No comment, be the first to comment.
