The Ultimate Floor Sanding Guide
DIY floor sanding does not have to be difficult on your body or expensive. Our 'Ultimate Floor Sanding Guide" will help you do it yourself. For the best results, trust the professionals to give you advice, help and assistance.
Sanding wood floors to maintain your home's value
A beautifully sanded flooring is both beautiful and attractive. This type of renovation can transform your home into a home, and increase your property's value. These beautiful spaces are often the focus of our attention. But how do we invest in their maintenance?
Think back to when you last sanded wooden floors in your house. What has happened since then? What's happened since then? Scratches, patches, and scuffs What about celebrations, commiserations, and graduations? Your floors have supported you and your family through it all. Now it's time for your floors to be restored to their former glory. You can now sand your wooden floors and make them re-usable.
DIY Floor Sanding - Pros & Cons
Sanding wooden floors does not require a lot of skill. This process can be time-consuming and hard work. You will need help and support as there is labor and cost involved. This is a possible goal with patience and preparation. It will help you keep your home looking great without having to spend a lot of money in repairs.
You must research. How you approach the task will depend on how your floors are sanded. Before you start any work, assess your situation to ensure that you have the correct equipment. It will save you both time and frustration when you make sure you have all the necessary equipment before you start any home renovation projects.
Section 1: Before you start your floor sanding project
It is essential to have the correct equipment for your floor sanding job. Before you start the actual floor sanding, make sure you have all the necessary items. These sections will explain exactly what you should do to prepare for your floor-sanding project.
What equipment is required to sand wooden floors?
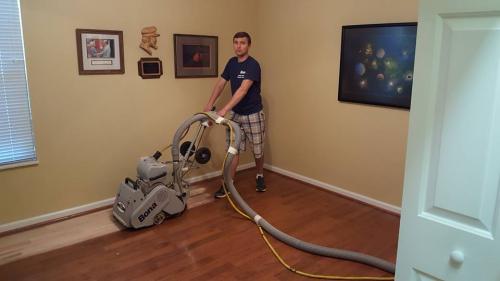
A Polivac is a must-have for beginners. This tool is less aggressive than a belt sander, and it's easier to use. It's ideal for light sanding jobs. This tool uses a back-and-forth sanding motion which makes it slower and lighter, making it ideal for beginners.
A belt sander is needed if you find that your floor has been damaged or missing a layer of finish during your assessment. This is also called a drum floor-sander. Although it is still possible, be aware that this process requires more control and strength than an orbital floor sander.
The correct sandpaper is required for both a Polivac floor sander and a drum floor. The state of your wooden floors will determine the best sandpaper. A 60 grit sandpaper is a good place to start if you aren't sure. You might want something coarser if the floor is extremely rough.
As your job progresses you will be able to use finer grit 120 for your finishing. For those who aren't familiar with sandpaper grits, you start at 24 and move up to 40, 80 and 120 sandpaper before moving on to Polyvac 150 grit. This is why our Ultimate Floor Sanding Guide recommends that you spend time researching and taking the right decision.
You will also need other preparation materials to put together before you start:
1. Floor edger for skirtings
2. Small detail floor sander for corners
3. Hammer
4. Nails
5. Vacuum cleaner
6. Large empty bins
7. Many large bin bags
8. Dust masks (trust us, choose quality over cheap!)
9. Ear muffs
10. Extension cord for heavy duty (at least 10 m long)
11. Shoes that are sturdy
12. This is not a job you can do alone.
Floor sanding preparation
1. Take off any old floor coverings
Make sure that you have removed all floor coverings from the area you are sanding. This includes carpets, materials and staples.
2. Make sure there are no protruding nail heads
You must ensure that any nails are not left in the area you're sanding.
3. Nail holes can be made more attractive by adding putty
Putty must be applied to the nail holes.
4. Before you begin, make sure you have a clean and dry floor
It will be much easier to avoid injury or time-wasting when sanding floors. Once you have started, take your time. You can vacuum, dust, and sweep the area to prepare for your Floor Sanding in West Auckland project.
5. Cordon the space where you are working
You should make sure your work area is as compact as possible. It would be a shame to walk out after admiring all your hard work and find the entire house covered in dust from sanding floors. It's important that all people are informed about what's happening and that pets are also kept away from the affected area.
Preparation of drum floor sanders and Polivac floor-sanders
Your sander will have directional arrows that indicate where to place your sandpaper. To make moving easier, the drum sander will come with a removable handle. This must be secured and kept in good order. You should dispose of it when it is full.
Both the drum floor sander as well as the Polivac floor-sander are heavy. Your support person will be needed to assist you in lifting and kicking the drum floor sander and to ensure that you have a firm grip. Before you start, ask them to stand away.
Section 2: Floor Sanding Guide - Step-By-Step Process
Open floor sander: Turn your machine so that it is facing forward. Start with the lowest grit, then move to 120 finer grit for your final finish.
Add sandpaper to the drum: Slide the sandpaper roller onto the drum. Sandpaper will need to be changed frequently. The Ultimate Floor Sanding Guide suggests that you take it slow and continuously check the condition of your sandpaper, rather than hurrying ahead.
Start in the middle of the room. Smooth motions are better than jerking movements.
Follow the floor grain when sanding: Use as smooth as possible and use both the up- and down grain. Keep moving forward in an even manner with the machine.
Keep the drum up! You run the risk to scratch the floor if you don't.
Dust must be removed after each stage. After every stage, use your vacuum to remove all dust. This will help you clean up after the coating process and will make your work environment safer and more comfortable.
Sand wooden floors with the same gradient To ensure smooth sanding, ensure that the Polivac and floor edger are working in the same direction. This will ensure professional results.
You can hand sand edges with the right sandpaper.
All dust must be removed before you apply coating.
The next step after sanding is to coat the floor. You should allow your floor to dry between coats. Otherwise, you will be back at the sander. Take your time.
Section 3: What are some common mistakes when DIY Sanding Wooden Floors
Many home projects are abandoned because they were not planned or given enough time. This is not an easy job. Be prepared for it to take a while, especially if you're doing this for the first time.
Safety equipment is essential for success. It is vital to use high quality safety gear and materials. Don't compromise your floors or yourself with cheap corners.
Sanding floors can produce a lot of dust. You should have enough bin bags and space for all of the dust. To keep it under control, make sure to clean the floors between each pass.
These machines are powerful and can pull a lot of weight. You will need someone to lift it and help you move it.
Sanding a floor can be done easily. This is something you should do regularly to ensure your floors are in top condition. This preserves the value of your home and makes your space something you are proud to be in.
Sanding a floor takes effort, time and energy. Although the end result is worth it, if you find the task overwhelming, help is available! To avoid the hassle of dealing with dust and heavy machinery, contact an expert floor sander. Brisbane's Finest Floors will make your wooden floors look brand new again, leaving you with more time to enjoy your home.
Post Your Ad Here
Comments