How to Add Inner Text Shadow in GIMP
The
users who are well-versed in Adobe Photoshop know how to add inner shadow to
the text in GIMP. Most of the Adobe Photoshop users understand that they can
add it through layer styles. However, GIMP does not offer such features, making
it tricky to add an inner shadow in GIMP to the text. So, the users need to
follow some distinct steps to add internal text successfully. So, first of all,
install GIMP and then follow the below-given steps:-
§ First
of all, you will need to create a new document and open it by clicking on it.
§ Then,
add some text to the document.
§ Now,
click on File to open it and then click on New.
§ Further,
When prompted to the dialog box, Create a New Image, click on it.
§ Click
on the Image Size section and set the size of the image as you want and click
on Ok.
§ Choose
and click on the Background color box section when the new document will be
opened.
§ Choose
the color you want and set it for the background.
§ After
selecting the color and placing it, click on, Ok.
§ You
will further need to tap on Edit and then go to Fill with BG color section and
click on it.
§ You can
fill your background with your preferred color.
§ You
will need to select the text along with setting the tone to the Foreground by
clicking on the Foreground color.
§ Choose
the Text Tool and click on it.
§ After
choosing the blank document, enter the text you want to add in the text editor
of GIMP.
§ Modify
the size and face of the selected font by using the controls available in the
section Tool Options palette.
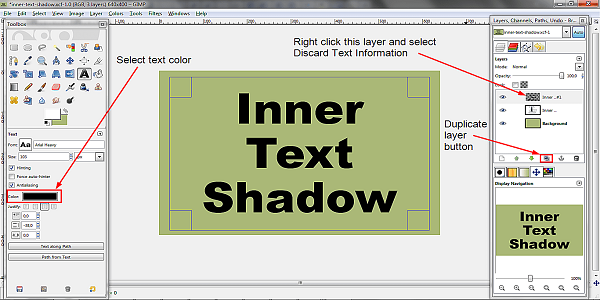
§ Duplicate
and rasterize the layer to make the inner shadow base.
§ To do
that, click on the sheet and then click on the option Duplicate Layer.
§ Choose
the latest layer and right-click on it.
§ Rasterize
the selected layer by clicking on Discard Text Information.
§ If
there is a need to move the text layer, go to Toolbox, and choose the Move tool
from there.
Now,
after selecting the text layer appearing in black color, choose arrow keys
available on your computer keyboard and use them to move the text to different
directions you want.
Note: The original amount you want to move the layer depends on
the size of the text you have selected. If the text size is larger, then it
will require movement if you have chosen a document, then it will require you
to move only to one pixel. Now, you continue the steps:-
§ Now, go
to the Layers palette and click on it.
§ Then,
go to the text layer appearing at the lower and right-click on it.
§ Select
and then click on the section Alpha to Selection.
§ The
outline in the form of marching ants will appear to you.
§ If you
have clicked on the upper layer of the text, click on Edit and click on Clear.
§ When
you click on Clear, it will remove most of the text appearing in black color.
§ Delete
the marching ants by going to Select and then clicking on None.
§ Make
sure that you have selected the layer looking at the upper by going to Layers
palette.
§ Then,
first, click on Filters and then click on Blur.
Once
you complete all the steps entirely, then adding inner shadow will become easy
for you. Here are the remaining steps:-
§ You
will then be prompted to Gaussian Blur and click on it.
§ Once
the dialog box Gaussian blur is opened, make sure that the icon of the chain
visible next to the Blur Radius is not broken.
§ Click
on the symbol of a chain
§ When
you found a Blur Radius broken.
§ Now,
choose the arrows up and down placed beside the Horizontal input box and
Vertical input box and blur the text as much as you want.
§ Once
you have set the amount to the blur text layer, then click on Ok.
§ Use the
feature Alpha to Selection and then the Layer Mask to make the layer you have
blurred to look the same as an inner shadow.
§ If you
are currently working on the larger text, it will require you to move the layer
blurred.
§ Choose
and click on Move Tool for moving the layer blurred.
§ Now,
again select the lower text layer and right-click on it by going to the Layers
palette and then choose Alpha to Selection.
§ In the
end, select the top layer and right-click on it.
§ Choose
and click on the Add Layer Mask option to open the dialog box.
§ In the
Add Layer Mask dialog box, choose and then click on Selection and then select
Add.
When
you click on Add, it will hide the blurred layer’s falling outside the text
layer’s borders. It will give you the impression of an inner shadow to the
text.
Source URL - How to
Add Inner Text Shadow in GIMP
Post Your Ad Here
Comments